Toyota Sienna Service Manual: Terminals of ECU
1. CHECK DRIVER SIDE J/B ASSEMBLY (MULTIPLEX NETWORK BODY ECU)
- Disconnect the B6, 1C, 1K and 1L J/B connectors.
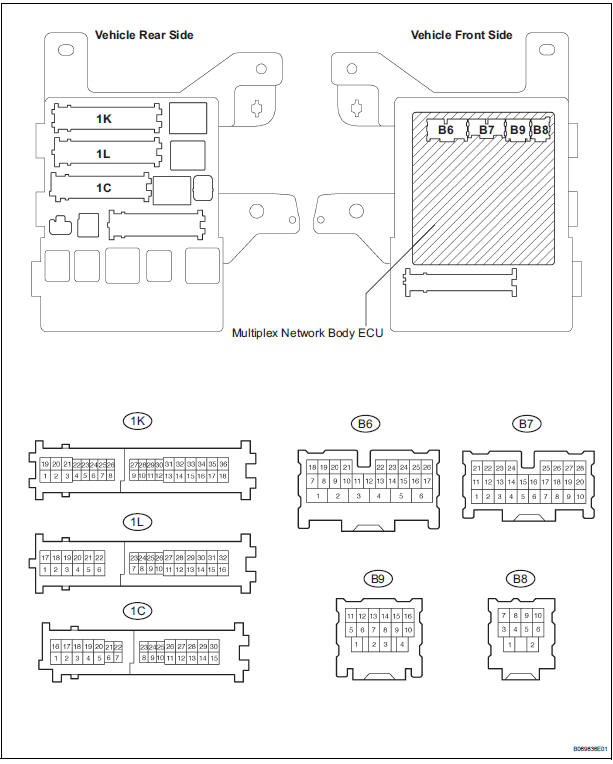
- Measure the voltage and resistance according to the value(s) in the table below.

HINT: If the result is not as specified, there may be a malfunction on the wire harness side.
- Reconnect the 1C, 1K, 1L and B6 connectors.
- Measure the voltage according to the value(s) in the table below.
Standard voltage

 Operation check
1. REMOVE CHECK FUNCTION
Check that the key reminder warning buzzer
sounds.
With the driver side door closed, insert the key
into the ignition key cylinder and then turn the
...
 Diagnosis system
1. CHECK DLC3
The vehicle's ECU uses ISO 15765-4 for
communication protocol. The terminal arrangement
of the DLC3 complies with SAE J1962 and matches
the ISO 15765-4 format.
NOT ...
Other materials:
Front Airbag Sensor RH Circuit Malfunction
DTC B1148/36 Front Airbag Sensor RH Circuit Malfunction
DESCRIPTION
The front airbag sensor RH circuit consists of the center airbag sensor
assembly and front airbag sensor
RH. If the center airbag sensor assembly receives signals from the front airbag
sensor RH, it judges
whether or not the ...
Fail-safe chart
1. FAIL-SAFE
This function minimizes the loss of the ECT functions
when any malfunction occurs in a sensor or solenoid.
(a) ATF (Automatic Transmission Fluid) temperature
sensor:
When the ATF temperature sensor has a
malfunction, 5th upshift is prohibited.
(b) Counter gear speed sensor NC ...
Insufficient Coolant Temperature for Closed Loop Fuel Control
DESCRIPTION
Refer to DTC P0115 (See page ES-133).
MONITOR DESCRIPTION
The resistance of the ECT sensor varies in proportion to the actual ECT. The
ECM supplies a constant
voltage to the sensor and monitors the signal output voltage of the sensor. The
signal voltage output
varies acc ...
