Toyota Sienna 2010-2026 Owners Manual: Using the radio
Radio operation
Select ‚ÄúAM‚ÄĚ or ‚ÄúFM‚ÄĚ on the audio source selection screen to begin listening to the radio.
Audio control screen
Pressing the ‚ÄúAUDIO‚ÄĚ button displays the audio control screen from any screens of the selected source.
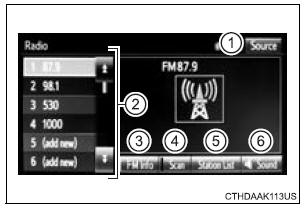
- Audio source selection screen appears
- Preset stations
- Select to display RBDS text messages*
- Scanning for receivable station
- Select to display a list of receivable stations
- Setting the sound
*: FM only
Selecting a station
Tune in to the desired station using one of the following methods.
Seek tuning
Press the ‚Äú‚ÄĚ or ‚Äú‚ÄĚ button on ‚ÄúSEEK‚ÄĘTRACK‚ÄĚ.
The radio will begin seeking up or down for a station of the nearest frequency and will stop when a station is found.
Manual tuning
Turn the ‚ÄúTUNE‚ÄĘSCROLL‚ÄĚ knob.
Preset stations
Select the desired preset station.
Setting station presets
- Search for desired stations by turning the ‚ÄúTUNE‚ÄĘSCROLL‚ÄĚ knob or pressing the ‚Äú‚ÄĚ or ‚Äú‚ÄĚ button on ‚ÄúSEEK‚ÄĘTRACK‚ÄĚ.
- Select ‚Äú(add new)‚ÄĚ.
To change the preset station to a different one, select and hold the preset station.
- Select ‚ÄúYes‚ÄĚ.
- Select ‚ÄúOK‚ÄĚ after setting the new preset station.
Refreshing the station list
- Select ‚ÄúRefresh‚ÄĚ on the ‚ÄúStation List‚ÄĚ screen.
To cancel the refresh, select ‚ÄúCancel Refresh‚ÄĚ.
Reception sensitivity
- Maintaining perfect radio reception at all times is difficult due to the continually changing position of the antenna, differences in signal strength and surrounding objects, such as trains, transmitters, etc.
- The radio antenna is mounted inside the rear quarter window. To maintain clear radio reception, do not attach metallic window tinting or other metallic objects to the antenna wire mounted inside the rear quarter window.
 Optimal use of the audio
system
Optimal use of the audio
system
On the ‚ÄúSound Settings‚ÄĚ screen, sound quality (Treble/Mid/
Bass), volume balance can be adjusted.
How to adjust the sound settings and sound quality
1, 2, 3 Select ‚Äú-‚ÄĚ or ‚Äú+‚ÄĚ to adj ...
 Playing an audio CD and
MP3/WMA/AAC discs
Playing an audio CD and
MP3/WMA/AAC discs
Insert disc or select ‚ÄúCD‚ÄĚ on the audio source selection screen
with a disc inserted to begin listening to a CD.
Audio control screen
Pressing the ‚ÄúAUDIO‚ÄĚ button displays the audio control ...
Other materials:
Disassembly
1. INSPECT UNDERDRIVE PLANETARY GEAR
PRELOAD
HINT:
(See page AX-260)
2. REMOVE FRONT PLANETARY GEAR NUT
(a) Using SST, loosen the staked part of the lock nut.
SST 09930-00010 (09931-00010, 09931-00020),
09387-00050
(b) Place the underdrive planetary gear in a soft jaw
vise.
NOTIC ...
Engine
ON-VEHICLE INSPECTION
1. INSPECT ENGINE COOLANT
(a) Inspect the engine coolant (See page CO-1).
2. INSPECT ENGINE OIL
(a) Inspect the engine oil (See page LU-1).
3. INSPECT BATTERY
(a) Inspect the battery (See page CH-5).
4. INSPECT AIR CLEANER FILTER ELEMENT SUBASSEMBLY
(a) Remove the air c ...
Short to GND in Rear Curtain Shield Squib RH
Circuit
DTC B1632/81 Short to GND in Rear Curtain Shield Squib RH
Circuit
DESCRIPTION
The rear curtain shield squib RH circuit consists of the center airbag sensor
assembly and the curtain
shield airbag assembly RH.
The circuit instructs the SRS to deploy when deployment conditions are met.
DTC ...
