Toyota Sienna 2010-2026 Owners Manual: ‚ÄúContact/Call History Settings‚ÄĚ screen
- Display the ‚ÄúPhone/Message Settings‚ÄĚ screen.
- Select ‚ÄúContact/Call History Settings‚ÄĚ.
- Select the desired item to be set.
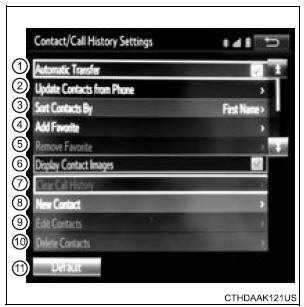
- For PBAP compatible Bluetooth¬ģ phones, select to set ‚ÄúAutomatic Transfer‚ÄĚ on/ off. When set to on, the phone‚Äôs contact data and history are automatically transferred.
- Select to update contacts
from the connected phone.
- Select to sort contacts by the first name or last name field.
- Select to add contacts to the favorites list.
- Select to delete contacts from the favorites list.
- Select to display contact images.
- Select to clear contacts from the call history.*
- Select to add new contacts to the contact list.*
- Select to edit contacts in the contact list.*
- Select to delete contacts from the contact list.*
- Select to reset all setup items.
*: For PBAP compatible Bluetooth¬ģ phones only, this function is available when ‚ÄúAutomatic Transfer‚ÄĚ is set to off.
 Contact/Call History
Settings
Contact/Call History
Settings
The contact can be transferred from a Bluetooth¬ģ phone to the system.
The contact also can be added, edited and deleted.
The call history can be deleted and contact and favorites can be
change ...
 Update contacts from phone
Operation methods differ between PBAP compatible and PBAP
incompatible but OPP compatible Bluetooth¬ģ phones.
If your cellular phone is neither PBAP nor OPP compatible, the contacts
cannot be tra ...
Other materials:
Reassembly
1. INSTALL LOWER RADIATOR GRILLE
Engage the 16 claws to install the lower radiator
grille to the front bumper cover.
2. INSTALL FRONT BUMPER HOLE COVER LH (w/o
Fog Light)
Engage the 2 pins to install the front bumper hole
cover LH to the front bumper cover.
3. INSTALL FRON ...
Window lock switch
Press the switch down to lock the
passenger window switches.
Use this switch to prevent children
from accidentally opening or closing
a passenger window.
The power windows can be operated when
The engine switch is in the ‚ÄúON‚ÄĚ position (vehicles without a smart key
system)
or IGNIT ...
No. 2 Speaker with box
COMPONENTS
ON-VEHICLE INSPECTION
1. INSPECT NO.2 SPEAKER WITH BOX
HINT:
Remove interior parts so that the No.2 speaker with box
can be seen.
Check the speaker installation.
OK:
The speaker is securely installed.
If the result is not as specified, reinstall the No.2
s ...
