Toyota Sienna Service Manual: Basic repair hint
(a) HINTS ON OPERATIONS
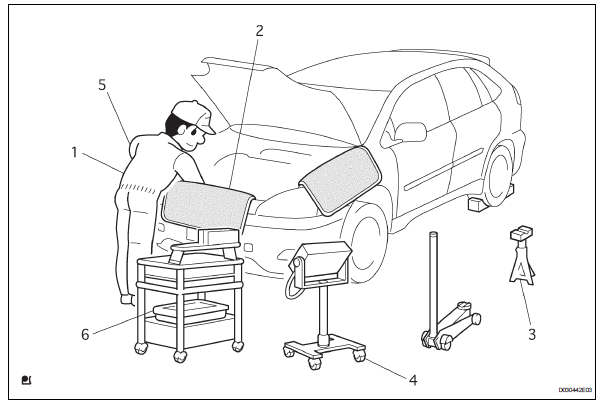 BASIC REPAIR HINT
| 1 | Attire | • Always wear a clean uniform.
• Hat and safety shoes must be worn. |
| 2 | Vehicle protection | Prepare a grille cover, fender cover, seat cover and floor mat before starting the operation. |
| 3 | Safety operation | • When working with 2 or more persons, be sure to check safety for one
another.
• When working with the engine running, make sure to provide ventilation for exhaust fumes in the workshop. • If working on high temperature, high pressure, rotating, moving, or vibrating parts, wear appropriate safety equipment and take extra care not to injure yourself or others. • When jacking up the vehicle, be sure to support the specified location with a safety stand. • When lifting up the vehicle, use appropriate safety equipment. |
| 4 | Preparation of tools and measuring gauge | Before starting operation, prepare a tool stand, SST, gauge, oil and parts for replacemen |
| 5 | Removal and installation, disassembly and assembly operations | • Diagnose with a thorough understanding of proper procedures and of
the reported
problem.
• Before removing the parts, check the general condition of the assembly and for deformation and damage. • When the assembly is complicated, take notes. For example, note the total number of electrical connections, bolts, or hoses removed. Add matchmarks to insure reassembly of components in the original positions. Temporarily mark hoses and their fittings if needed. • Clean and wash the removed parts if necessary and assemble them after a thorough check. |
| 6 | Removed parts | • Place the removed parts in a separate box to avoid mixing them up
with the new parts
or contaminating the new parts.
• For non-reusable parts such as gaskets, O-rings, and self-locking nuts, replace them with new ones as instructed in this manual. • Retain the removed parts for customer inspection, if requested. |
(b) JACKING UP AND SUPPORTING VEHICLE
(1) Care must be taken when jacking up and supporting the vehicle. Be sure to lift and support the vehicle at the proper locations.
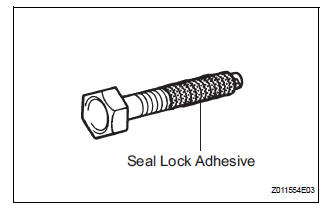
(c) PRECOATED PARTS
(1) Precoated parts are bolts and nuts that are coated with a seal lock adhesive at the factory.
(2) If a precoated part is retightened, loosened or moved in any way, it must be recoated with the specified adhesive.
(3) When reusing a precoated part, clean off the old adhesive and dry the part with compressed air.
Then apply new seal lock adhesive appropriate to that part.
(4) Some seal lock agents harden slowly. You may have to wait for the seal lock adhesive to harden.
(d) GASKETS
(1) When necessary, use a sealer on gaskets to prevent leaks.
(e) BOLTS, NUTS AND SCREWS
(1) Carefully follow all the specifications for tightening torques. Always use a torque wrench.
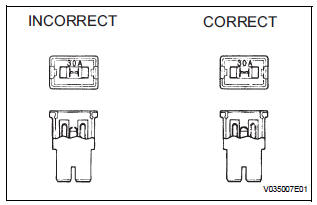
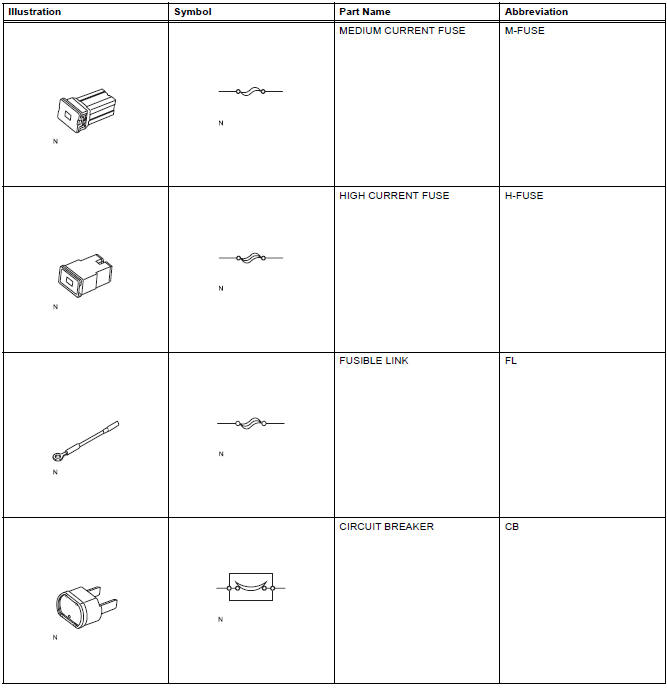
(f) FUSES
(1) When inspecting a fuse, check that the wire of the fuse is not broken.
(2) When replacing fuses, be sure that the new fuse has the correct amperage rating. Do not exceed the rating or use one with a lower rating.
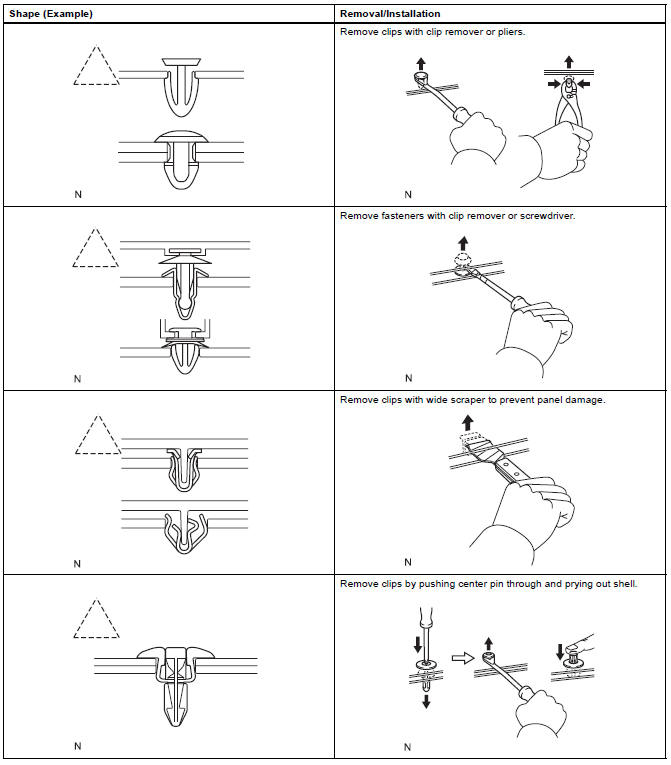
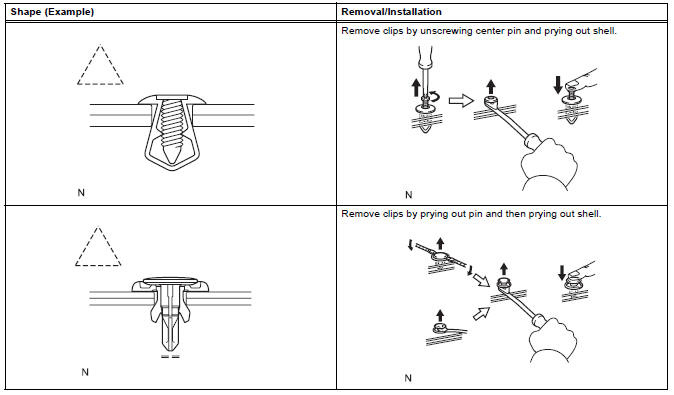
(g) CLIPS
(1) The removal and installation methods of typical clips used for vehicle body parts are shown in the table below.
HINT: If clips are damaged during work, always replace the damaged clip with a new one.
(h) REMOVAL AND INSTALLATION OF VACUUM HOSES
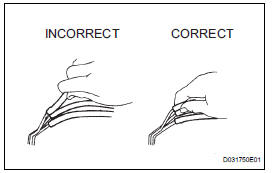
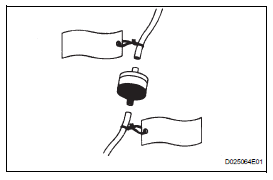
(1) To disconnect a vacuum hose, pull and twist from the end of the hose. Do not pull from the middle of the hose as this may cause damage.
(2) When disconnecting vacuum hoses, use tags to identify where they should be reconnected.
(3) After completing any hose related repairs, double check that the vacuum hoses are properly connected. The label under the hood shows the proper layout.
(4) When using a vacuum gauge, never force the hose onto a connector that is too large. If a hose has been stretched, it may leak air. Use a stepdown adapter if necessary.
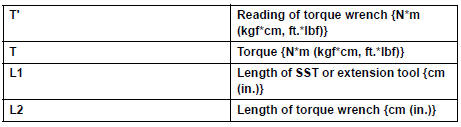
(i) TORQUE WHEN USING TORQUE WRENCH WITH EXTENSION TOOL
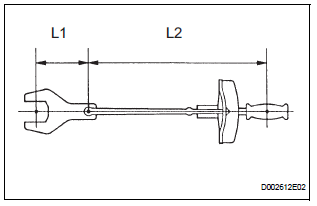
(1) Use the formula below to calculate special torque values for situations where SST or an extension tool is combined with the torque wrench.
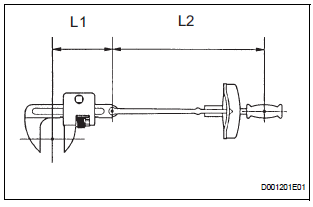
Formula: T' = L2/(L1 + L2) * T
 Precaution
...
 For vehicles equipped with srs airbag and seat belt pretensioner
The SIENNA is equipped with a Supplemental Restraint System (SRS).
CAUTION: Failure to carry out the service operations in the correct sequence could cause the SRS to unexpectedly deploy during se ...
Other materials:
Installation
1. Install purge vsv
(A) install the purge vsv with the bolt.
Torque: 10 n*m (102 kgf*cm, 7 ft.*Lbf)
(B) connect the 2 vacuum hoses and no. 1 Vacuum
switching valve connector.
2. INSTALL V-BANK COVER SUB-ASSEMBLY (See
page EM-63)
3. CONNECT CABLE TO NEGATIVE BATTERY
TERMINAL ...
Automatic transaxle unit
COMPONENTS
...
Installation
1. Connect inlet sub-assembly
(a) Connect the inlet hose to the radiator.
(b) Install the inlet sub-assembly to the radiator with the
bolt.
Torque: 7.1 N*m (72 kgf*cm, 63 in.*lbf)V
2. Install no. 2 Radiator support
(A) install the no. 2 Radiator support to the radiator with
the 2 ...
