Toyota Sienna Service Manual: Inspection
1. INSPECT TIRES
(a) Check the tires for wear and proper inflation pressure.
Cold tire inflation pressure 
(b) Using a dial indicator, check the runout of the tires.
Tire runout: 1.4 mm (0.055 in.) or less
2. ROTATE TIRES
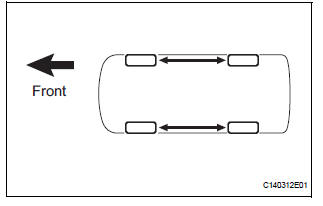
HINT: Rotate the tires as shown in the illustration.
3. INSPECT WHEEL BALANCE (for Steel Wheel)
(a) Check and adjust the off-the-car balance.
Imbalance after adjustment: 8.0 g (0.018 lb.) or less.
HINT: If necessary, check and adjust the on-the-car balance.
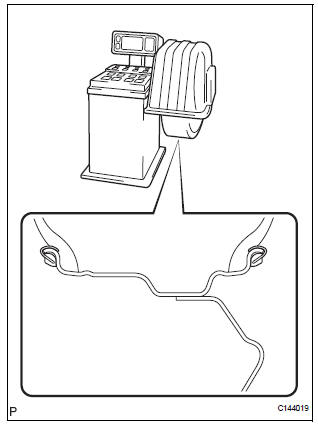
4. INSPECT WHEEL BALANCE (for Non-steel Wheel)
(a) Check and adjust the off-the-car balance.
Imbalance after adjustment: 8.0 g (0.018 lb.) or less.
NOTICE:
- Use a cleaning detergent to remove dirt, oil and water from the surface where the balance weight is to be adhered.
- Do not touch the sticking surface of the tape.
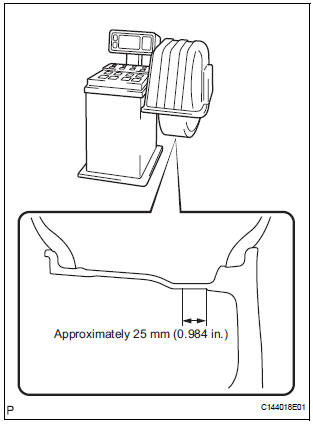
- Adhere the sticking type balance weight to the flat position shown in the illustration.
- Push the balance weight securely with a finger to adhere it to the position.
- Do not reuse the balance weight.
HINT:
- The inner side balance weight should be installed by clipping it to the rim.
- If necessary, check and adjust the on-the-car balance.
5. INSPECT FRONT AXLE HUB BEARING LOOSENESS
HINT: See page AH-5.
6. INSPECT REAR AXLE HUB BEARING LOOSENESS (for 2WD)
HINT: See page AH-16.
7. INSPECT REAR AXLE HUB BEARING LOOSENESS (for 4WD)
HINT: See page AH-19.
8. INSPECT FRONT AXLE HUB RUNOUT
HINT: See page AH-5.
9. INSPECT REAR AXLE HUB RUNOUT (for 2WD)
HINT: See page AH-16.
10. INSPECT REAR AXLE HUB RUNOUT (for 4WD)
HINT: See page AH-19.
 Problem symptoms table
HINT:
Use the table below to help determine the cause of the
problem. The likely causes of the problem are indicated in
descending order. Check each suspected area in order. If
necessary, repair o ...
 Repair
1. INTRODUCTION
(a) This section introduces ways to determine whether
the run-flat tire is repairable or not. Repair must be
performed by following the appropriate procedures.
If a flat tire occ ...
Other materials:
Open in ABS Solenoid Relay Circuit
DESCRIPTION
This relay supplies power to each ABS solenoid.
Immediately after the ignition switch is turned to the ON position, the relay
turns on if the solenoid is
determined to be normal as a result of self-diagnosis during initial check.
The relay turns off if an open/short is dete ...
Message Settings
Display the “Phone/Message Settings” screen.
Select “Messaging Settings”.
Select the desired item to be set.
Set automatic message
transfer on/off.
Set automatic message
readout on/off.
Set the SMS/MMS notification
popup on/off.
Set the e-mail notification
pop ...
Disassembly
1. HOLD VANE PUMP ASSEMBLY
(a) Using SST, hold the vane pump assembly in a vise.
SST 09630-00014 (09631-00132)
2. REMOVE POWER STEERING SUCTION PORT UNION
(a) Remove the bolt and the power steering suction port
union from the vane pump front housing.
(b) Using a screwdriver, remove ...
