Toyota Sienna 2010-2026 Owners Manual: Inspection and adjustment procedure
- Tire valve
- Tire pressure gauge
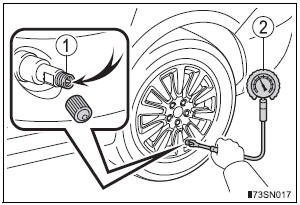
- Remove the tire valve cap.
- Press the tip of the tire pressure gauge onto the tire valve.
- Read the pressure using the gauge gradations.
- If the tire inflation pressure is not at the recommended level, adjust
the pressure.
If you add too much air, press the center of the valve to deflate.
- After completing the tire inflation pressure measurement and adjustment, apply soapy water to the valve and check for leakage.
- Put the tire valve cap back on.
Tire inflation pressure check interval
You should check tire inflation pressure every two weeks, or at least once a month.
Do not forget to check the spare.
Effects of incorrect tire inflation pressure
Driving with incorrect tire inflation pressure may result in the following:
- Reduced fuel economy
- Reduced driving comfort and poor handling
- Reduced tire life due to wear
- Reduced safety
- Damage to the drive train
If a tire needs frequent inflating, have it checked by your Toyota dealer.
Instructions for checking tire inflation pressure
When checking tire inflation pressure, observe the following:
- Check only when the tires are cold.
If your vehicle has been parked for at least 3 hours or has not been driven for more than 1 mile or 1.5 km, you will get an accurate cold tire inflation pressure reading.
- Always use a tire pressure gauge.
It is difficult to judge if a tire is properly inflated based only on its appearance.
- It is normal for the tire inflation pressure to be higher after driving as heat is generated in the tire. Do not reduce tire inflation pressure after driving.
- Never exceed the vehicle capacity weight.
Passengers and luggage weight should be placed so that the vehicle is balanced.
| WARNING Proper inflation is critical to save tire performance Keep your tires properly inflated. If the tires are not properly inflated, the following conditions may occur which could lead to an accident resulting in death or serious injury:
|
| NOTICE When inspecting and adjusting tire inflation pressure Be sure to put the tire valve caps back on. If a valve cap is not installed, dirt or moisture may get into the valve and cause an air leak, resulting in decreased tire inflation pressure. |
 Tire inflation pressure
The recommended cold tire inflation pressure and tire size are displayed on
the tire and loading information label. ...
 Wheels
If a wheel is bent, cracked or heavily corroded, it should be
replaced.
Otherwise, the tire may separate from the wheel or cause a loss
of handling control. ...
Other materials:
Data list / active test
1. DATA LIST
HINT:
Using the intelligent tester to read the Data List allows
the values or states of switches, sensors, actuators and
other items to be read without removing any parts. This
non-intrusive inspection can be very useful because
intermittent conditions or signals may be discovered ...
Description of initialization
(a) Perform initialization in the following cases:
Before delivery of a new vehicle.
After replacement of the tire pressure warning
ECU*.
After replacement of the tire pressure warning
valve and transmitter.
Specified tire pressure changes depending on
the size or type of the tire.
...
Removal
1. PRECAUTION
CAUTION:
Be sure to read "PRECAUTION" thoroughly before servicing.
2. DISCONNECT CABLE FROM NEGATIVE BATTERY
TERMINAL
CAUTION:
Wait for 90 seconds after disconnecting the cable to
prevent the airbag working.
3. REMOVE FRONT SEAT ASSEMBLY (for Manual Seat)
4. REMOVE F ...
