Toyota Sienna Service Manual: Installation
1. INSTALL REAR AXLE HUB & BEARING ASSEMBLY LH
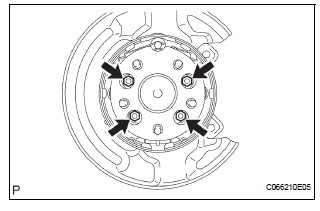
(a) Install the hub & Bearing assembly LH with the 4 bolts.
Torque: 56 N*m (571 kgf*cm, 41 ft.*lbf)
2. INSPECT BEARING BACKLASH (See page AH-16)
3. INSPECT AXLE HUB DEVIATION (See page AH-16)
4. CONNECT SKID CONTROL SENSOR WIRE
(a) Connect the connector
NOTICE: Do not twist the sensor wire when connecting it.
5. INSTALL REAR DISC
(a) Install rear disc for disc rear brake type.
6. INSTALL REAR BRAKE DRUM SUB-ASSEMBLY
(a) Install rear brake drum sub-assembly for drum rear brake type.
7. INSTALL REAR DISC BRAKE CALIPER ASSEMBLY LH
(a) Install the rear disc brake caliper assembly LH with the 2 bolts for disc rear brake type.
Torque: 88 N*m (900 kgf*cm, 65 ft.*lbf)
8. INSTALL REAR WHEEL Torque: 103 N*m (1,050 kgf*cm, 76 ft.*lbf)
9. CHECK ABS SPEED SENSOR SIGNAL
(a) ABS WITH EBD SYSTEM (See page BC-3).
(b) ABS WITH EBD & BA & TRAC & VSC SYSTEM (See page BC-72).
 Removal
HINT:
Replace the RH side by the same procedures as the LH side.
1. REMOVE REAR WHEEL
2. REMOVE REAR DISC BRAKE CALIPER ASSEMBLY
LH
(a) Removing the 2 bolts, separate the rear disc brake
caliper ...
 Rear axle hub and bearing (for 4wd)
COMPONENTS
...
Other materials:
Auxiliary boxes
Type A
Push the lid.
Type B
Push down the knob.
Type C (if equipped)
Type D
Type E (if equipped)
Type F
Lift the lid.
Type G (if equipped)
Removing the second center seat.
Type H (if equipped)
Type I (if equip ...
Short to GND in CAN Bus Line
DESCRIPTION
A short to GND is suspected in the CAN bus wire when the resistance between
terminals 4 (CG) and 6
(CANH), or terminals 4 (CG) and 14 (CANL) of the DLC3 is below 200 Ω.
Symptoms
Trouble Area
The resistance between terminals 6 (CANH) and 4 (CG), or ter ...
Cup holders
Front
Press in and release the front cup
holder.
Console box type A
(if equipped)
Console box type B
(if equipped)
Pull the lid down.
Console box type C
(if equipped)
Second seat (if equipped)
Removing the second center seat.
Rear
...
