Toyota Sienna Service Manual: Installation
1. INSTALL AIR CONDITIONING BLOWER ASSEMBLY
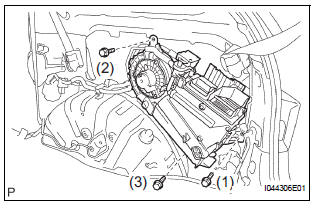
(a) Install the air conditioning blower assembly with the 3 bolts.
Torque: 5.4 N*m (55 kgf*cm, 48 in.*lbf)
NOTICE: Tighten the bolts in the order shown in the illustration to install the air conditioning blower assembly.
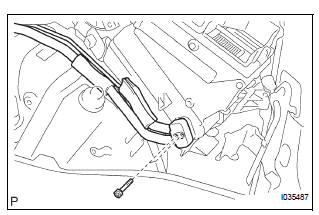
2. INSTALL AIR CONDITIONING TUBE AND ACCESSORY ASSEMBLY
(a) Sufficiently apply compressor oil to 2 new O-rings and the fitting surface of the air conditioning tube & accessory assembly.
Compressor oil: ND-OIL 8 or equivalent
(b) Install the 2 O-rings on the air conditioning tube & accessory assembly.
(c) Install the air conditioning tube & accessory assembly with the 2 bolts.
Torque: 3.5 N*m (36 kgf*cm, 31 in.*lbf)
3. ADD ENGINE COOLANT
HINT: See page CO-7.
4. CHARGE REFRIGERANT
SST 07110-58060 (07117-58060, 07117-58070, 07117-58080, 07117-58090, 07117-78050, 07117-88060, 07117-88070, 07117-88080)
HINT: See page AC-172.
5. WARM UP ENGINE
6. INSPECT FOR ENGINE COOLANT LEAK
HINT: See page CO-1.
7. INSPECT REFRIGERANT LEAK
HINT: See page AC-168.
 Reassembly
1. INSTALL HEATER RADIATOR UNIT SUB-ASSEMBLY
(a) Install the heater radiator unit sub-assembly to the
air conditioning blower assembly.
(b) Install the 2 O-rings to the heater water valve
as ...
 Blower motor
On-vehicle inspection
1. INSPECT BLOWER WITH FAN MOTOR SUBASSEMBLY
(a) Connect the positive (+) lead from the battery to
terminal 2 and negative (-) to terminal 1, then check
that the motor op ...
Other materials:
Inspection
1. INSPECT WINDSHIELD WIPER MOTOR ASSEMBLY
LO Operation Check
Connect the battery (+) to the terminal 1 (+1) of
the connector, the battery (-) to the terminal 5
(E) of the connector, and check that the motor
operates at low speed (LO).
HI Operation Check
...
Air Outlet Damper Position Sensor Circuit
DESCRIPTION
This sensor detects the position of the air outlet control servo motor and
sends the appropriate signals to
the A/C amplifier. The position sensor is built in the air outlet control servo
motor. The position sensor's
resistance changes as the air outlet control servo motor arm ...
Initialization
1. RESET
Reset the power slide door system:
The power slide door ECU records the fully open
position of the power slide door in its memory and
the power slide door fully opens and closes based
on this memory. The power slide door cannot
operate without this memory. In the case wh ...
