Toyota Sienna Service Manual: Installation
1. INSTALL REAR DOOR WINDOW FRAME MOULDING
- Remove the tape from the rear door window frame moulding.
- Clean the contact surface of the vehicle body with white gasoline.
- Clean the outer circumference of the rear door window frame moulding with white gasoline.
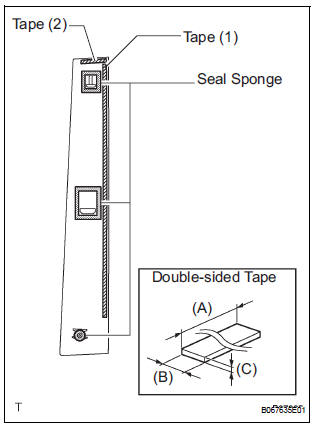
- Apply new double-sided tape to the rear door window frame moulding, as shown in the illustration.
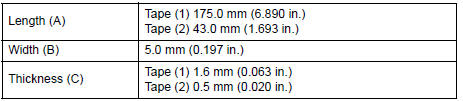
Dimensions:

- Using a heat light, heat the vehicle body and rear door window frame moulding.
Heating temperature:

NOTICE: Do not heat the body and rear door window frame moulding excessively.
- Remove the peeling paper from the face of the rear
door window frame moulding face.
HINT: Be careful that dirt or foreign objects do not stick to the adhesive part when removing the peeling paper.
- Engage the 2 claws and install the rear door window frame moulding with the screw.
NOTICE: Do not apply excessive force onto the rear door window frame moulding, but steady pressure with your thumbs.
2. INSTALL REAR DOOR WINDOW REAR FRAME MOULDING
- Remove the tape from the rear door window rear frame moulding.
- Clean the contact surface of the vehicle body with white gasoline.
- Clean the outer circumference of the rear door window rear frame moulding with white gasoline.
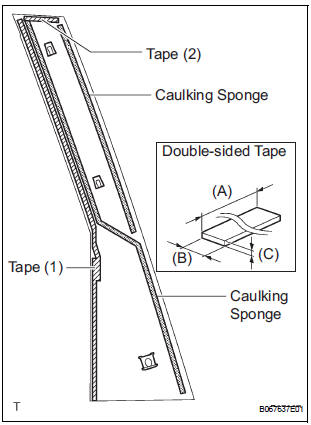
- Apply new double-sided tape to the rear door window rear frame moulding, as shown in the illustration.
Dimensions:
- Using a heat light, heat the vehicle body and rear door window rear frame moulding.
Heating temperature:

NOTICE: Do not heat the body and rear door window rear frame moulding excessively.
- Remove the peeling paper from the face of the rear
door window rear frame moulding face.
HINT: Be careful that dirt or foreign objects do not stick to the adhesive part when removing the peeling paper.
- Engage the 2 claws and install the rear door window rear frame moulding with the screw.
NOTICE: Do not apply excessive force onto the rear door window rear frame moulding, but steady pressure with your thumbs.
 Removal
1. REMOVE REAR DOOR WINDOW FRAME MOULDING
Remove the screw.
Using a heat light, heat the rear door window frame
moulding between 40 to 60 C (104 to 140 F).
NOTICE:
Do not heat the rear ...
 Front fender garnish
COMPONENTS
...
Other materials:
Installation
1. INSTALL BACK DOOR OUTSIDE GARNISH
Install the back door outside opener switch with the
2 screws.
Install the back door outside garnish with the 5 nuts
and a clip.
Connect the licence light connector.
2. INSTALL LH BACK-UP LIGHT ASSEMBLY (See page
LI-90)
3. INSTALL RH ...
Short to B+ in Rear Curtain Shield Squib RH
Circuit
DTC B1633/82 Short to B+ in Rear Curtain Shield Squib RH
Circuit
DESCRIPTION
The rear curtain shield squib RH circuit consists of the center airbag sensor
assembly and the curtain
shield airbag assembly RH.
The circuit instructs the SRS to deploy when deployment conditions are met.
DTC B ...
High Temperature
DTC 58-45 High Temperature
DTC 80-45 High Temperature
DESCRIPTION
DTC No.
DTC Detection Condition
Trouble Area
58-45
High map disc player temperature is detected (Over
80C).
Radio and navigation assembly
80-45
High map disc player tem ...
