Toyota Sienna Service Manual: Removal
1. REMOVE REAR DOOR WINDOW FRAME MOULDING
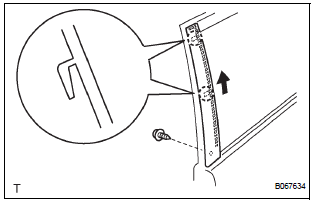
- Remove the screw.
- Using a heat light, heat the rear door window frame
moulding between 40 to 60 C (104 to 140 F).
NOTICE: Do not heat the rear door window frame moulding excessively.
- Slide the rear door window frame moulding upward
to remove the moulding.
NOTICE: If reusing the moulding, take care not to damage the rear door window frame moulding.
2. REMOVE REAR DOOR WINDOW REAR FRAME MOULDING
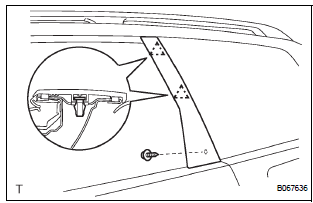
- Remove the screw.
- Using a heat light, heat the rear door window rear
frame moulding between 40 to 60 C (104 to 140
F).
NOTICE: Do not heat the rear door windou rear frame moulding excessively.
- Slide the rear door windou rear frame moulding
upward to remove the moulding.
NOTICE: If reusing the moulding, take care not to damage the rear door windou rear frame moulding.
 Rear door window frame moulding
COMPONENTS
...
 Installation
1. INSTALL REAR DOOR WINDOW FRAME MOULDING
Remove the tape from the rear door window frame
moulding.
Clean the contact surface of the vehicle body with
white gasoline.
Clean the outer ...
Other materials:
System description
1. GENERAL DESCRIPTION
The power seat control system is equipped with the
following function:
The front seats are equipped with electric
adjuster slide, reclining, lifter, front vertical and
lumbar support adjustment functions.
The power seat control system (w ...
Oxygen (A/F) Sensor Heater Control Circuit
HINT
Although the DTC titles say the oxygen sensor, these DTCs relate to the
Air-Fuel Ratio (A/F) sensor.
Sensor 1 refers to the sensor mounted in front of the Three-Way
Catalytic Converter (TWC) and
located near the engine assembly.
DESCRIPTION
Refer to DTC P2195 (See page ES- ...
Removal
1. DISCHARGE FUEL SYSTEM PRESSURE
2. REMOVE V-BANK COVER SUB-ASSEMBLY
3. DRAIN ENGINE COOLANT
4. REMOVE WINDSHIELD WIPER MOTOR ASSEMBLY
5. REMOVE FRONT OUTER COWL TOP PANEL SUBASSEMBLY
6. REMOVE AIR CLEANER CAP SUB-ASSEMBLY
7. REMOVE AIR CLEANER CASE SUB-ASSEMBLY
8. REMOVE INTAKE AIR SURGE TA ...
