Toyota Sienna Service Manual: Installation
1. INSTALL ROOF HEADLINING ASSEMBLY
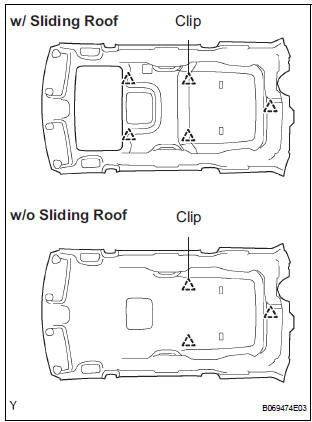
- w/ sliding roof: Install the roof headlining with the 5 clips.
- w/o sliding roof: Install the roof headlining with the 3 clips.
NOTICE: In order to prevent the roof headlining from becoming bent, work must be performed by 2 or more persons when removing/installing it.
2. INSTALL ROOF CONSOLE BOX
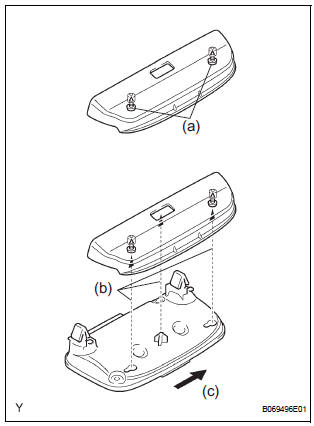
- Temporarily install the 2 screws to the retainer.
- Set the console box, as shown in the illustration.
- Slide the console box in the direction indicated by the arrow mark in the illustration so that the screws can meet the keyholes.
- Tighten the 2 screws.
- Tighten the 2 torx screws.
 Removal
HINT:
On the LH side, use the same procedures as on the RH side.
1. REMOVE FRONT DOOR SCUFF PLATE RH
Using a screwdriver, disengage the 3 clips and 2
claws, and remove the scuff plate.
...
 Sliding roof
...
Other materials:
Reassembly
1. INSTALL FRONT DRIVE SHAFT BEARING
(a) Using SST and a press, install a new front drive
shaft bearing.
SST 09710-30021 (09710-03141), 09527-10011
NOTICE:
Bearing should be completely installed.
2. INSTALL FRONT DRIVE SHAFT RH HOLE SNAP RING
(a) Using a snap ring expander, install a ...
How to proceed with
troubleshooting
HINT:
Troubleshoot in accordance with the procedures on the
following pages.
1 VEHICLE BROUGHT TO WORKSHOP
2 DTC CHECK
Check for DTCs and make a note of the code that is
output (See page MP-14).
Delete the DTC.
Check if the DTC is output once again when the problem
symptom is simulat ...
SRS Warning Light does not Come ON
DESCRIPTION
WIRING DIAGRAM
INSPECTION PROCEDURE
1 CHECK BATTERY
Measure the voltage of the battery.
Standard voltage:
11 to 14 V
2 CHECK CONNECTORS
Turn the ignition switch to the LOCK position.
Disconnect the negative (-) terminal cable from the
battery, and wait for at le ...
