Toyota Sienna 2010-2026 Owners Manual: Installation with LATCH system (second seat)
- Fold the seatback while pulling the lever and move to the rearmost recline position.
- Widen the gap between the seat cushion and seatback slightly.
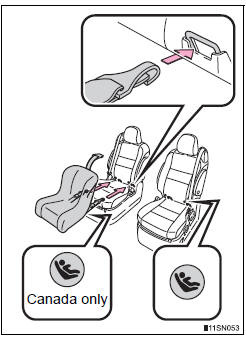
- Type A
- Latch the hooks of the lower
straps onto the LATCH
anchors. If the child restraint
has a top tether strap, the top
tether strap should be latched
onto the top tether strap anchor.
For owners in Canada: The symbol on a child restraint system indicates the presence of a lower connector system.
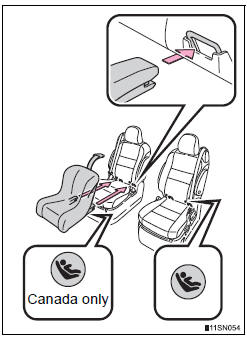
- Type B
- Latch the buckles onto the
LATCH anchors. If the child
restraint has a top tether strap,
the top tether strap should be
latched onto the top tether strap
anchor.
For owners in Canada: The symbol on a child restraint system indicates the presence of a lower connector system.
 Installing child restraints
Follow the child restraint system manufacturer’s instructions.
Firmly secure child restraints to the rear seats using the LATCH
anchors or a seat belt. Attach the top tether strap whe ...
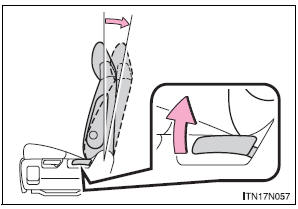
 Installation with LATCH system (third seat)
Manual seat
Fold the seatback while pulling
the strap. Return the seatback
and secure it at the 1st lock
position (most upright position).
Adjust the seatback to the
11th lock p ...
Other materials:
Diagnosis system
1. DESCRIPTION
(a) When troubleshooting OBD II vehicles, the only
difference from the usual troubleshooting procedure
is to connect an OBD II scan tool complying with
SAE J1987 or a intelligent tester to the vehicle, and
read off various data output from the vehicle's ECM.
(b) OBD II reg ...
Inspection
1. INSPECT REAR SPEED SENSOR
(a) Remove the seat cushion and seatback.
(b) Disconnect the speed sensor connector.
(c) Measure the resistance between terminals 1 and 2
of the speed sensor connector
OK:
Resistance:
1.1 +- 0.2 kΩ at 25 +- 5 °C
(d) Measure the resistance between ea ...
System description
1. GENERAL
In conjunction with impact absorbing structure for a
frontal collision, the SRS (Supplemental Restraint
System) driver airbag and front passenger airbag
were designed to supplement seat belts in the event
of a frontal collision in order to help reduce shock to
the head and c ...
