Toyota Sienna 2010-2026 Owners Manual: Installation with LATCH system (third seat)
- Manual seat
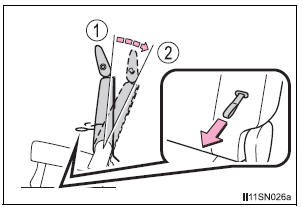
- Fold the seatback while pulling
the strap. Return the seatback
and secure it at the 1st lock
position (most upright position).
Adjust the seatback to the 11th lock position.
- 1st lock position
- 11th lock position
- Power seat
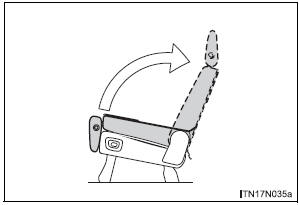
- Fold down the seatback by
pressing the folding/returning
switch . Raise the
seatback by pressing the same
switch, the returning switch or the seatback angle
adjustment switch .
(The seatback will automatically stop.) Do not touch the switch while the seatback is moving, because the operation will stop.
- Widen the gap between the seat cushion and seatback slightly.
- Type A
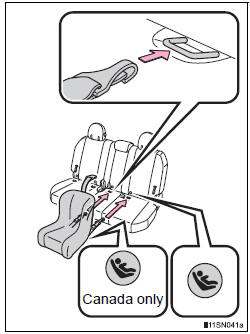
- Latch the hooks of the lower
straps onto the LATCH
anchors. If the child restraint
has a top tether strap, the top
tether strap should be latched
onto the top tether strap anchor.
For owners in Canada: The symbol on a child restraint system indicates the presence of a lower connector system.
- Type B
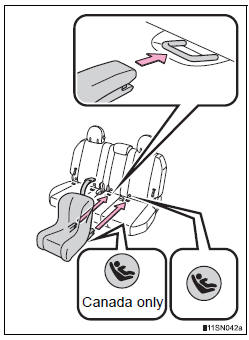
- Latch the buckles onto the
LATCH anchors. If the child
restraint has a top tether strap,
the top tether strap should be
latched onto the top tether strap
anchor.
For owners in Canada: The symbol on a child restraint system indicates the presence of a lower connector system.
 Installation with LATCH system (second seat)
Fold the seatback while pulling
the lever and move to the rearmost
recline position.
Widen the gap between the seat cushion and seatback slightly.
Type A
Latch the hooks o ...
 Installing child restraints using a seat belt (child restraint lock
function belt)
Installing child restraints using a seat belt (child restraint lock
function belt)
Rear facing - Infant seat/convertible seat
Place the child restraint system
on the rear seat facing
the rear of the vehicle.
Run the seat belt through the
child restraint syste ...
Other materials:
Diagnosis system
1. CHECK DLC3
The ECU uses ISO 15765-4 for communication.
The terminal arrangement of the DLC3 complies
with SAE J1962 and meets the ISO 15765-4 format.
NOTICE:
*: Before measuring the resistance, leave the
vehicle as is for at least 1 minute and do not
operate the igniti ...
How to register a Bluetooth® device
Display the “Bluetooth* Setup” screen.
*: Bluetooth is a registered trademark of Bluetooth SIG, Inc.
Select “Add”.
When this screen is displayed,
search for the device name displayed
on this screen on the
screen of your Bluetooth®
device.
For details about operati ...
Favorites list setting
Up to 15 contacts (maximum of 4 numbers per contact) can be registered
in the favorites list.
Registering the contacts in the favorites list
Select “Add Favorite”.
Select the desired contact to add to the favorites list.
Dimmed contacts are already stored as a favorite.
Check that a ...
