Toyota Sienna 2010-2026 Owners Manual: Installing child restraints
| Follow the child restraint system manufacturer’s instructions.
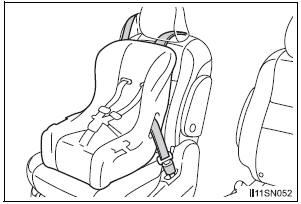
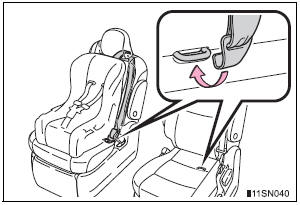
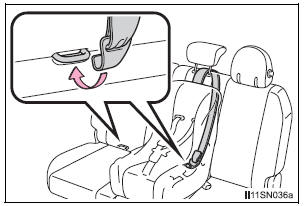
Firmly secure child restraints to the rear seats using the LATCH anchors or a seat belt. Attach the top tether strap when installing a child restraint. The lap/shoulder belt can be used if your child restraint system is not compatible with the LATCH (Lower Anchors and Tethers for Children) system. |
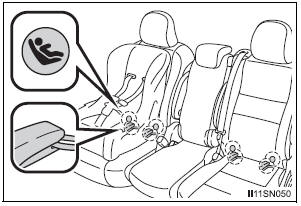
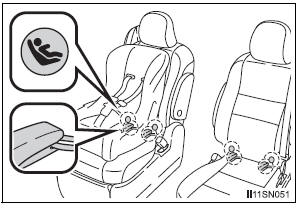
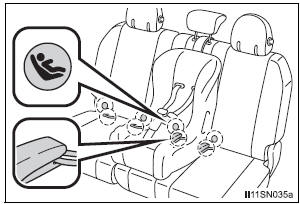
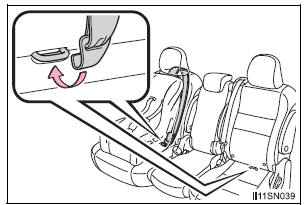
Child restraint LATCH anchors
- Second seats (8-passenger models)
LATCH anchors are provided for second outside seats. (Buttons displaying the location of the anchors are attached to the seats.)
- Second seats (7-passenger models)
LATCH anchors are provided for both second seats. (Buttons displaying the location of the anchors are attached to the seats.)
- Third seats
LATCH anchors are provided for the right outboard seat and center seat. (Buttons displaying the location of the anchors are attached to the seats.)
Seat belts equipped with a child restraint locking mechanism (ALR/ELR belts except driver’s seat belt)
Anchor brackets (for top tether strap)
- Second seats (8-passenger models)
Anchor brackets are provided for second outside seats.
- Second seats (7-passenger models)
Anchor brackets are provided for both second seats.
- Third seats
An anchor brackets are provided for the right outboard seat and center seat.
- Installation with LATCH system (second seat)
- Installation with LATCH system (third seat)
- Installing child restraints using a seat belt (child restraint lock function belt)
- Removing a child restraint installed with a seat belt
- Child restraint systems with a top tether strap (second seat)
- Child restraint systems with a top tether strap (third seat)
 Types of child restraints
Child restraint systems are classified into the following 3 types
according to the age and size of the child:
Rear facing - Infant seat/convertible seat
Forward facing - Convertible sea ...
 Installation with LATCH system (second seat)
Fold the seatback while pulling
the lever and move to the rearmost
recline position.
Widen the gap between the seat cushion and seatback slightly.
Type A
Latch the hooks o ...
Other materials:
Short to B+ in Rear Curtain Shield Squib LH
Circuit
DTC B1638/86 Short to B+ in Rear Curtain Shield Squib LH
Circuit
DESCRIPTION
The rear curtain shield squib LH circuit consists of the center airbag sensor
assembly and the curtain
shield airbag assembly LH.
The circuit instructs the SRS to deploy when deployment conditions are met.
DTC B ...
Power Slide Door Pulse Sensor Malfunction on
Rear Left Door
DTC B2224 Power Slide Door Pulse Sensor Malfunction on
Rear Left Door
DESCRIPTION
A pulse sensor is built into slide door LH for jam and foreign
object detection and for slide door position
detection. The jam and foreign object detection feature of the pulse sensor
monitors the o ...
ACC Power Source Circuit
DESCRIPTION
This circuit supplies power to the A/C amplifier and the illumination for the
clock.
WIRING DIAGRAM
INSPECTION PROCEDURE
1 INSPECT FUSE (ECU ACC)
(a) Remove the ECU ACC fuse from the engine room relay
block.
(b) Measure the resistance according to the value(s) in the
tab ...
