
Toyota Sienna Service Manual: Lubrication system
On-vehicle inspection
1. CHECK ENGINE OIL LEVEL
(a) Warm up the engine, stop it and wait 5 minutes. The oil level should be between the dipstick's low level mark and full level mark.
If the engine oil level is low, check for leakage and add oil up to the full level mark.
| NOTICE: Do not add engine oil above the full level mark. |
2. CHECK ENGINE OIL
(a) Check the engine oil for deterioration, water contamination, discoloring or thinning.
If the oil is bad, replace the engine oil and engine oil filter.
3. CHECK OIL PRESSURE
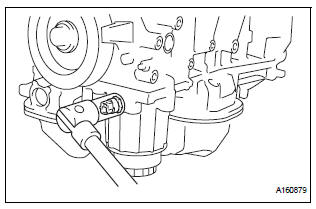
(a) Disconnect the oil pressure switch connector.
(b) Using a 24 mm deep socket wrench, remove the oil pressure switch.
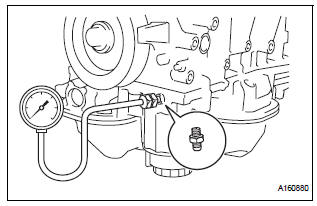
(c) Install the oil pressure gauge with adapter.
(d) Warm up the engine.
(e) Check the oil pressure.
Standard oil pressure 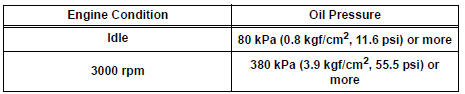
If the oil pressure is not as specified, check the oil pump (See page LU-13).
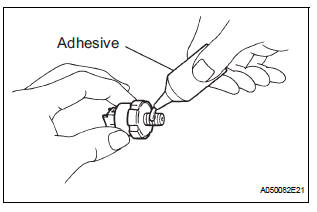
(f) Remove the oil pressure gauge.
(g) Apply adhesive to 2 or 3 threads of the oil pressure switch.
Adhesive: Toyota Genuine Adhesive 1344, Three Bond 1344 or equivalent
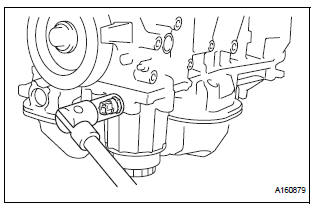
(h) Using a 24 mm deep socket wrench, install the oil pressure switch.
Torque: 15 N*m (153 kgf*cm, 11 ft.*lbf)
| NOTICE: Do not start the engine within 1 hour after installation. |
(i) Connect the oil pressure switch connector.
(j) Check for engine oil leaks.

 Oil and oil filter
COMPONENTS
REPLACEMENT
CAUTION:
Prolonged and repeated contact with engine oil will
result in the removal of natural oils from the skin,
leading to dryness, irritation and derma ...
Other materials:
Inspection
1. INSPECT PRELOAD
(a) Using SST(s) and a torque wrench, check the initial
torque within the backlash range.
SST 09326-20011
Torque: 0.9 to 1.4 N*m (9 to 14 kgf*cm, 8.0 to
12.4 in.*lbf)
HINT:
Use a torque wrench with a fulcrum length of 160
mm (6.30 in.).
(b) Using SST(s) and a torque w ...
Changing the rear setting
Adjusting the temperature setting
Press the “REAR� button (indicator and rear temperature on the
display on).
Turn the “REAR TEMP� dial clockwise to increase the temperature
and counterclockwise to decrease the temperature.
The air conditioning system switches between individual ...
How to proceed with
troubleshooting
HINT:
Troubleshoot in accordance with the procedures on the
following pages.
1 VEHICLE BROUGHT TO WORKSHOP
2 CUSTOMER PROBLEM ANALYSIS CHECK AND SYMPTOM CHECK
3 PROBLEM SYMPTOMS TABLE
When problem is not listed on problem symptoms table,
proceed to A.
When problem is listed on pro ...
