Toyota Sienna 2010-2026 Owners Manual: Message Settings
- Display the “Phone/Message Settings” screen.
- Select “Messaging Settings”.
- Select the desired item to be set.
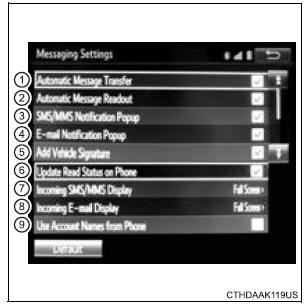
- Set automatic message transfer on/off.
- Set automatic message readout on/off.
- Set the SMS/MMS notification popup on/off.
- Set the e-mail notification popup on/off.
- Set adding the vehicle signature to outgoing messages on/off.
- Set updating message read status on phone on/off.
- Change the incoming SMS/MMS display.
“Full Screen”: When an SMS/MMS message is received, the incoming SMS/MMS display screen is displayed and can be operated on the screen.
“Drop-Down”: When an SMS/MMS message is received, a message is displayed on the upper side of the screen.
- Change the incoming e-mail display.
“Full Screen”: When an e-mail is received, the incoming e-mail display screen is the displayed and can be operated on the screen.
“Drop-Down”: When an e-mail is received, a message is displayed on the upper side of the screen.
- Set display of messaging account names on the inbox tab on/off.
When set to on, messaging account names used on the cellular phone will be displayed.
To return to the default settings
Select “Default”, and then “Yes”.
Displaying the “Messaging Settings” screen in a different way
- Display the phone screen.
- Select
 .
. - Select “Settings”.
 Favorites list setting
Up to 15 contacts (maximum of 4 numbers per contact) can be registered
in the favorites list.
Registering the contacts in the favorites list
Select “Add Favorite”.
Select the desired conta ...
 Phone Display Settings
Display the “Phone/Message Settings” screen.
Select “Phone Display Settings”.
Select the desired item to be set.
Change the incoming call
display.
“Full Screen”: When ...
Other materials:
Trip information
Type A
Press the “CAR” button.
Type B
Press the “APPS” button, and then select “Eco” on the screen.
If the “Past Record” screen is displayed, select “Trip Information”.
Reset the trip information data
Previous fuel consumption per
minute
Current fuel ...
Passenger Side Outer Mirror ECU
DTC B1208 Passenger Side Outer Mirror ECU
DESCRIPTION
This DTC is detected when communication between the outer mirror control ECU
RH and multiplex
network gateway ECU stops for more than 10 seconds.
DTC No.
DTC Detecting Condition
Trouble Area
B1208
Pa ...
Starting the engine
Check that the parking brake is set.
Check that the shift lever is set in P.
Firmly depress the brake pedal.
The engine switch indicator will turn green. If the indicator does not turn
green, the engine cannot be started.
Press the engine switch.
The engine will crank until it sta ...
