Toyota Sienna 2010-2026 Owners Manual: Moving a second seat for third seat access
Getting in the vehicle
- Tip-up seats
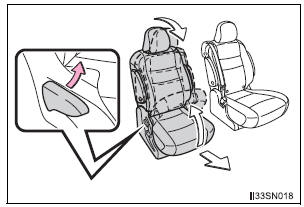
Pull the seatback angle adjustment lever and fold down the seatback. The cushion will tip up. The seat can slide forward.
Move the seat to the frontmost position.
- Ottoman seats

Pull the seatback angle adjustment lever and fold down the seatback. The seat can slide forward.
Move the seat to the frontmost position.
Getting out of the vehicle
- Tip-up seats
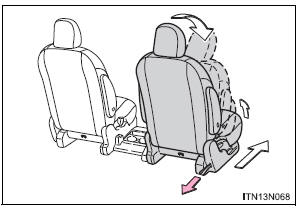
Pull the strap and fold down the seatback. The cushion will tip up. The seat can slide forward.
Move the seat to the frontmost position.
Make sure that no passenger is seated on the second seat before pulling the strap.
- Ottoman seats
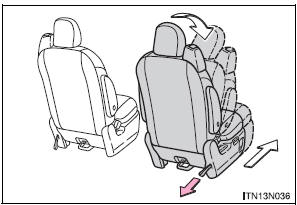
Pull the strap and fold down the seatback. The seat can slide forward.
Move the seat to the frontmost position.
Make sure that no passenger is seated on the second seat before pulling the strap.
After passengers have entered/exited the vehicle
Lift up the seatback and slide the seat backward until it locks.
 Adjustment procedure
Second seat
Tip-up seat (7-passenger models)
Seat position adjustment
lever
Seatback angle adjustment
lever
Tip-up seat (8-passenger models)
Seat position adjustmen ...
 Removing the second seats
Removing the second outside seats (Tip-up seats)
Pull the armrests up.
Pull the seatback adjustment
lever and fold down the seatback.
The cushion will tip up.
Slide the seat fo ...
Other materials:
Brake Warning Light Remains ON
DESCRIPTION
If the ECU detects a trouble, it turns on the brake warning light at the same
time of prohibiting ABS
control.
At this time, the ECU records a DTC in memory.
Connect terminals TC and CG of the DLC3 to make the brake warning light blink
and output the DTC.
WIRING DIAGRAM
...
Removal
1. REMOVE REAR SEAT LEG SIDE GARNISH SUBASSEMBLY LH
Disengage the clips and remove the seat leg side
garnish.
2. REMOVE REAR NO. 2 SEAT ASSEMBLY LH
Remove the bolt and locus cable.
Remove the 2 bolts and seat.
Remove the 2 headrests.
...
Reverse Signal Circuit
DESCRIPTION
The radio and navigation assembly receives a reverse signal from the
park/neutral position switch and
information about the GPS antenna, and then adjusts vehicle position.
WIRING DIAGRAM
INSPECTION PROCEDURE
1 INSPECT RADIO AND NAVIGATION ASSEMBLY
Disconnect the radio ...
