Toyota Sienna Service Manual: CD cannot be Inserted / Played or CD is Ejected Right After Insertion
INSPECTION PROCEDURE
1 CHECK IF A PROPER CD IS INSERTED
- Make sure that the CD is an audio CD or a CD with an MP3 or WMA file, and that it is not deformed, flawed, stained, burred, or otherwise defective.
OK: Normal CD.
HINT:
- Translucent or uniquely-shaped CDs cannot be played.
- CDs with adhesive paper labels should not be played.
- Commercial audio CDs can be played.
- CD-DA files on CD-ROMs, CD-Rs, and CD-RWs can be played.
- MP3 and WMA files on CD-ROMs, CD-Rs, and CDRWs can be played.
- For details on playable CDs, refer to the Owner's Manual.
2 CHECK THAT CD IS INSERTED PROPERLY
- Check whether or not the CD is inserted upside down.
OK: CD is properly inserted.
3 CHECK CD

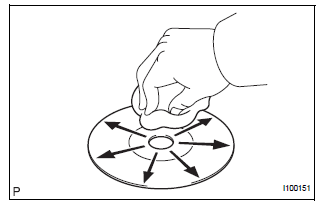
- Clean the disc by wiping it with a soft cloth from the inside to the outside in a radial direction.
OK: Malfunction disappears.
NOTICE: Do not use a conventional record cleaner or antistatic preservative.
END
4 REPLACE CD WITH ANOTHER AND RECHECK
- Replace the CD with a normal one and check that the malfunction disappears.
OK: Malfunction disappears.
END
 CD cannot be Ejected
INSPECTION PROCEDURE
1 PRESS "EJECT" AND CHECK OPERATION
Press the CD EJECT switch of the radio receiver for 2
seconds or more and check that the CD is ejected.
OK:
CD is ejected
...
 CD Sound Skips
INSPECTION PROCEDURE
1 CHECK CD
Check the CD.
OK:
The CD is clean.
HINT:
If dirt is on the CD surface, wipe it clean with a soft cloth
from the inside to the outside in a radial direct ...
Other materials:
Window glass antenna wire
INSPECTION
1. INSPECT WINDOW GLASS ANTENNA WIRE
Inspect the wind glass antenna wire.
NOTICE:
When cleaning the glass, use a soft, dry cloth,
and wipe the glass in the direction of the wire.
Take care not to damage the wires. Do not use
detergents or glass cleaners with abrasiv ...
Communication Error from Distance Control
ECU to ECM
DTC P1615 Communication Error from Distance Control
ECU to ECM
DTC U1101 Lost Communication with Distance Control
ECU
DESCRIPTION
The distance control ECU receives information about the area in front of the
vehicle from the laser sensor
and then sends a brake control demand signal (decelerat ...
ABS Warning Light Remains ON
DESCRIPTION
If any of the following is detected, the ABS warning light remains on.
The skid control ECU connectors are disconnected from the skid control
ECU.
There is a malfunction in the skid control ECU internal circuit.
There is an open in the harness between the combination meter an ...
