
Toyota Sienna Service Manual: Power back door opener / closer switch
INSPECTION
1. INSPECT SATELLITE SWITCH
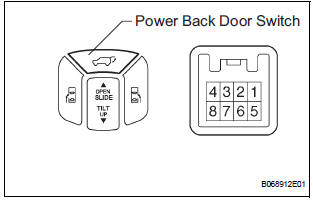
- Inspect the resistance of the back door switch.
Resistance

If the result is not as specified, replace the switch.
- Apply battery voltage and check whether the switch illuminates.
Standard

HINT: Whether the switch illuminates or not will not affect the function of the RH side.
If the result is not as specified, replace the bulb.
2. INSPECT SATELLITE SWITCH
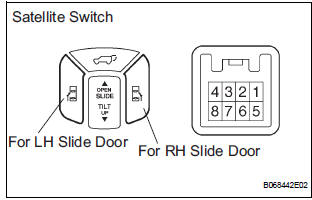
- Inspect the resistance of the switch for the LH / RH door.
Resistance

If the result is not as specified, replace the switch.
- Apply battery voltage and check whether the switch illuminates.
Standard

HINT: Whether the switch illuminates or not will not affect the function of the RH side.
If the result is not as specified, replace the bulb.
 Power back door main switch
INSPECTION
1. INSPECT POWER BACK DOOR MAIN SWITCH
Inspect the resistance of the main switch.
Resistance
If the result is not as specified, replace the switch.
Apply battery voltage ...
 Power back door touch sensor
INSPECTION
1. INSPECT POWER BACK DOOR TOUCH SENSOR LH
Check the resistance of the sensor.
Resistance
If the result is not as specified, replace the sensor.
2. INSPECT POWER BACK DOOR T ...
Other materials:
Installation
1. INSTALL BACK DOOR OUTSIDE GARNISH
Install the back door outside opener switch with the
2 screws.
Install the back door outside garnish with the 5 nuts
and a clip.
Connect the licence light connector.
2. INSTALL LH BACK-UP LIGHT ASSEMBLY (See page
LI-90)
3. INSTALL RH ...
How to proceed with
troubleshooting
1 VEHICLE BROUGHT TO WORKSHOP
2 CUSTOMER PROBLEM ANALYSIS
3 CHECK AND CLEAR DTCs
Refer to the diagnostic check/clear
4 PROBLEM SYMPTOM CONFIRMATION
5 SYMPTOM SIMULATION
6 CHECK DTC
7 CHECK IF THE SAME SYMPTOM APPEARS IN THE NAVIGATION SYSTEM
Refer to the navigation system
8 PROBLE ...
Short to GND in Side Squib LH Circuit
DTC B0117/45 Short to GND in Side Squib LH Circuit
DESCRIPTION
The side squib LH circuit consists of the center airbag sensor assembly and
the front seat side airbag
assembly LH.
This circuit instructs the SRS to deploy when deployment conditions are met.
DTC B0117/45 is recorded when a s ...
