Toyota Sienna Service Manual: Power seat switch
Inspection
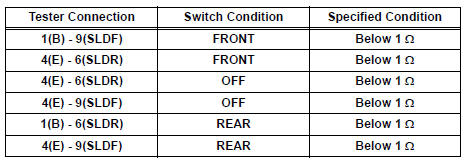
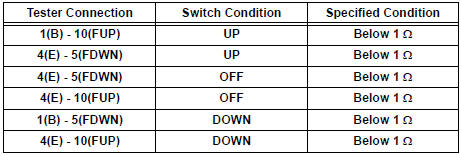
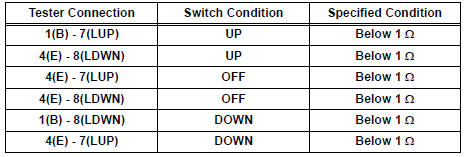
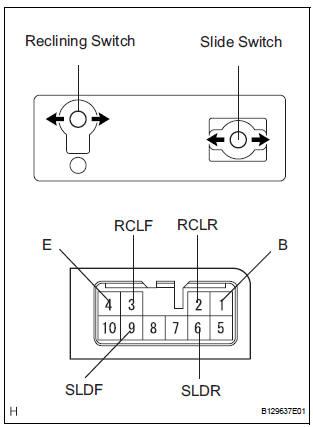
1. INSPECT FRONT POWER SEAT SWITCH
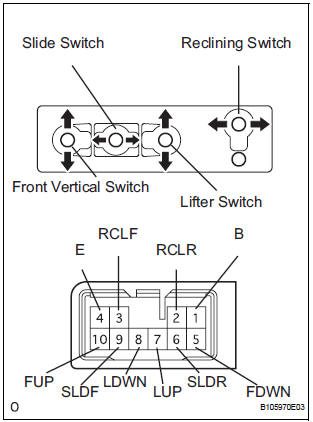
- Inspect the driver side power seat switch.
- Measure the resistance according to the value(s) in the table below.
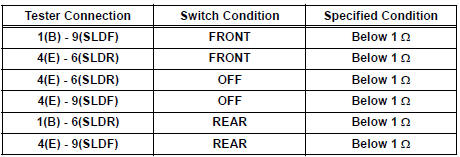
Standard resistance: Slide switch
Front vertical switch
Lifter switch
Reclining switch
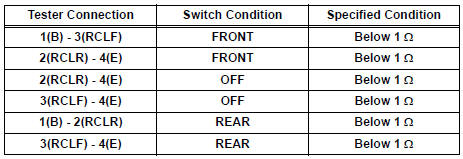
If the result is not as specified, replace the switch.
- Inspect the front passenger side power seat switch.
- Measure the resistance according to the value(s) in the table below.
Standard resistance: Slide switch
Reclining switch
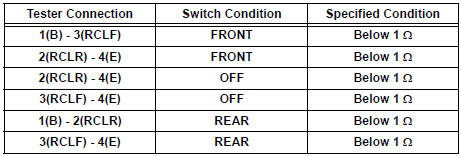
If the result is not as specified, replace the switch.
 Installation
1. INSTALL SEAT MEMORY SWITCH
2. INSTALL FRONT DOOR TRIM BOARD SUBASSEMBLY
LH
3. INSTALL POWER WINDOW REGULATOR MASTER
SWITCH ASSEMBLY
4. INSTALL FRONT DOOR INSIDE HANDLE BEZEL
PLUG LH
5. INSTA ...
 Front seat frame with adjuster
Inspection
1. INSPECT FRONT SEAT ADJUSTER SUB-ASSEMBLY LH
Check operation of the seat frame (slide motor).
Check if the seat frame moves smoothly when
the battery is conne ...
Other materials:
Short in Side Squib LH Circuit
DTC B0115/47 Short in Side Squib LH Circuit
DESCRIPTION
The side squib LH circuit consists of the center airbag sensor assembly and
the front seat side airbag
assembly LH.
This circuit instructs the SRS to deploy when deployment conditions are met.
DTC B0115/47 is recorded when a short ci ...
Freeze frame data
1. DESCRIPTION
The ECM records vehicle and driving condition
information as freeze frame data the moment a DTC
is stored. When troubleshooting, freeze frame data
can be helpful in determining whether the vehicle
was running or stopped, whether the engine was
warmed up or not, whe ...
Taking out the spare tire
Slide the front passenger’s seat to the frontmost lock position and
the right side second seat to the rearmost lock position so they will
not interfere with the jack handle.
Open the right side sliding door
and you will find the flap on the
floor. Pull back the flap to find
the ...
