
Toyota Sienna Service Manual: Power window master switch
Inspection
1. INSPECT POWER WINDOW REGULATOR MASTER SWITCH ASSEMBLY (w/ Jam Protection Function)
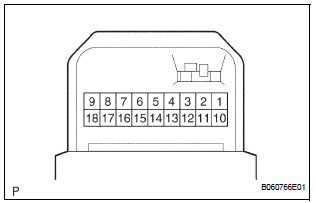
- Check the resistance between the terminals of the switch when the switch is operated.
Standard: AUTO (driver side) switch

Passenger side switch

Rear LH switch
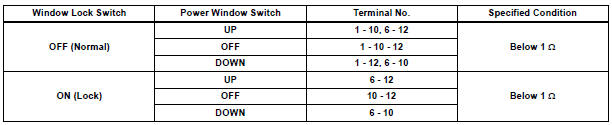
Rear RH switch
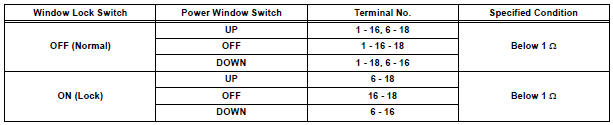
If the result is not as specified, replace the switch assembly.
2. INSPECT POWER WINDOW REGULATOR MASTER SWITCH ASSEMBLY (w/o Jam Protection Function)

- Check the resistance between the terminals of the switch when the switch is operated.
Standard: AUTO (driver side) switch

Passenger side switch

Rear LH switch
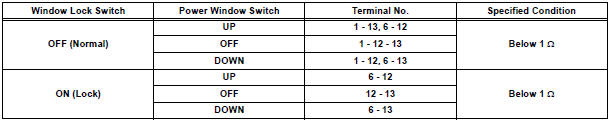
Rear RH switch

If the result is not as specified, replace the switch assembly.
 Problem symptoms table
POWER WINDOW CONTROL SYSTEM (W/O JAM PROTECTION)
Symptom
Suspected Area
All power windows do not operate
PWR fuse
Power window relay (Marking: P/W)
Ig ...
 Front passenger side power
window switch
Front passenger side power
window switch
Inspection
1. INSPECT POWER WINDOW REGULATOR SWITCH ASSEMBLY
Check the resistance between the switch terminals
when the switch is operated.
Standard
If the result is not as spec ...
Other materials:
Removal
1. REMOVE CENTER REAR SEAT LAP TYPE BELT
ASSEMBLY (for 8-Passenger)
HINT:
Refer to the instructions for disassembly of the rear No. 1 seat assembly (for
center seat).
Remove the bolt and center seat lap type belt
assembly.
2. REMOVE CENTER REAR NO. 2 SEAT LAP BELT
ASSEMBLY WITH ...
Reassembly
1. INSTALL FRONT DISC
(a) Aligning the matchmarks, install the front disc.
HINT:
Select the installation position where the disc has
the minimum runout.
2. INSPECT DISC RUNOUT
(a) Temporarily fasten the disc with the hub nuts.
Torque: 103 N*m (1,050 kgf*cm, 76 ft.*lbf)
(b) Using a ...
Suspension
SERVICE DATA
A: Ground clearance of front wheel center
B: Ground clearance of lower suspension arm No. 2 set bolt
center
C: Ground clearance of rear axle carrier bush set bolt center
D: Ground clearance of rear wheel center
TORQUE SPECIFICATIONS
TIRE AND WHEEL
SERVICE DATA
T ...
