Toyota Sienna Service Manual: Removal
1. PRECAUTION
HINT: See page RS-1
2. SEPARATE BATTERY NEGATIVE TERMINAL
3. PLACE FRONT WHEELS FACING STRAIGHT AHEAD
4. REMOVE HORN BUTTON ASSEMBLY (See page RS- 424)
5. REMOVE STEERING WHEEL ASSEMBLY (See page SR-6)
6. REMOVE STEERING COLUMN COVER LWR (See page RS-434)
7. REMOVE SPIRAL CABLE SUB-ASSEMBLY (See page RS-434)
8. REMOVE STEERING ANGLE SENSOR
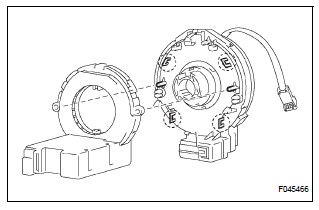
(a) Release the claw fittings and remove the steering sensor from the spiral cable.
 Steering angle sensor
COMPONENTS
...
 Installation
1. INSTALL STEERING ANGLE SENSOR
(a) Install the steering sensor onto the spiral cable.
2. PLACE FRONT WHEELS FACING STRAIGHT AHEAD
3. INSTALL SPIRAL CABLE SUB-ASSEMBLY (See page
RS-434)
4. I ...
Other materials:
Jam Protection Function Activates During Power Back Door Operation
DESCRIPTION
It may be caused by ill-fitting back door, faulty touch sensor or
faulty pulse sensor.
The power back door ECU activates the back motor to open / close
the power back door, thus
controlling the power back door operation. For jam and foreign object
detection, the power ba ...
DTC check / clear
1. USING INTELLIGENT TESTER
Hook up the intelligent tester to the DLC3.
Monitor the ECU data by following the prompts on
the tester screen.
HINT:
intelligent tester has "Snapshot" function which
records the monitored data. Please refer to the
intelligent tester op ...
Coolant Thermostat (Coolant Temperature Below Thermostat Regulating
Temperature)
HINT:
This DTC relates to the thermostat.
DESCRIPTION
This DTC is set when the Engine Coolant Temperature (ECT) does not reach 75°C
(167°F) despite
sufficient engine warm-up time.
MONITOR DESCRIPTION
The ECM estimates the ECT based on the starting temperature, engine loads,
a ...
