
Toyota Sienna Service Manual: Removal
1. DISCHARGE FUEL SYSTEM PRESSURE
2. REMOVE V-BANK COVER SUB-ASSEMBLY
3. DRAIN ENGINE COOLANT
4. REMOVE WINDSHIELD WIPER MOTOR ASSEMBLY
5. REMOVE FRONT OUTER COWL TOP PANEL SUBASSEMBLY
6. REMOVE AIR CLEANER CAP SUB-ASSEMBLY
7. REMOVE AIR CLEANER CASE SUB-ASSEMBLY
8. REMOVE INTAKE AIR SURGE TANK ASSEMBLY
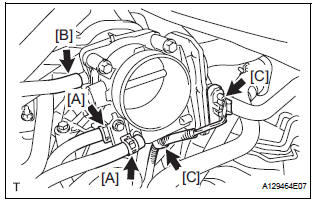
- Disconnect the 2 water by-pass hoses from the throttle body [A].
- Disconnect the vapor feed hose [B].
- Disconnect the throttle body connector and clamp [C].
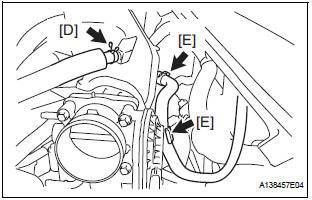
- Disconnect the ventilation hose [D].
- Disconnect the union to check valve hose [E].
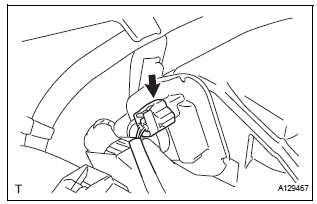
- Disconnect the connector [F].
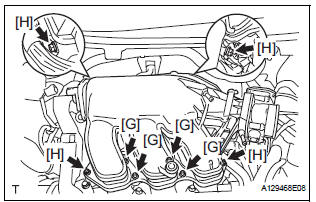
- Using a 5 mm socket hexagon wrench, remove the 4 bolts [G].
- Remove the 2 nuts, 2 bolts and intake air surge tank [H].
- Remove the gasket from the intake air surge tank [I].
9. REMOVE FUEL MAIN TUBE SUB-ASSEMBLY
10. REMOVE INTAKE MANIFOLD
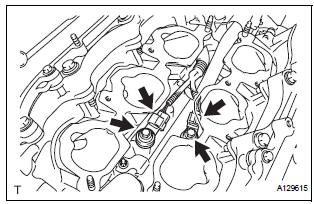
11. REMOVE KNOCK CONTROL SENSOR
- Disconnect the 2 knock sensor connectors.
- Remove the 2 bolts and then remove the 2 knock control sensors.
 Knock sensor
COMPONENTS
...
 Inspection
1. KNOCK CONTROL SENSOR
Using an ohmmeter, measure the resistance
between the terminals.
Resistance:
120 to 280 kΩ at 20C (68F)
If the resistance is not specified, replac ...
Other materials:
Positioning a floor jack
When using a floor jack, follow the instructions in the manual
provided with the jack and perform the operation safely.
When raising your vehicle with a floor jack, position the jack correctly.
Improper placement may damage your vehicle or cause
injury.
Front
Rear
2WD ...
Installation
1. INSTALL WATER PUMP ASSEMBLY
(a) Install a new water pump gasket and the water
pump assembly with the 16 bolts.
Torque: Bolt A
21 N*m (214 kgf*cm, 15 ft.*lbf)
Bolts B and C
9.1 N*m (93 kgf*cm, 81 in.*lbf)
NOTICE:
Make sure that there is no oil on the threads
of bolts A.
...
Terminals of ECU
1. POSITION CONTROL ECU AND SWITCH ASSEMBLY
(POWER SEAT CONTROL SWITCH AND ECU)
Disconnect the P58 and P59 connectors.
Check the voltage of each terminal of the wire
harness side connectors.
If the result is not as specified, there may be a
malfunction in the wire harn ...
