Toyota Sienna Service Manual: Removal
NOTICE:
- Always wear safety gloves because the edges of the seatback frame and seat adjuster are sharp and may cause injury.
- Work must be started more than 90 seconds after the
ignition switch is turned to the LOCK position and the
negative (-) terminal cable is disconnected from the
battery.
(The SRS is equipped with a back-up power source. If work is started within 90 seconds from disconnecting the negative (-) terminal cable of the battery, the SRS may deploy.)
HINT: Use the same procedures for the RH side and LH side.
1. REMOVE FRONT SEAT HEADREST ASSEMBLY
2. REMOVE FRONT SEAT ASSEMBLY LH
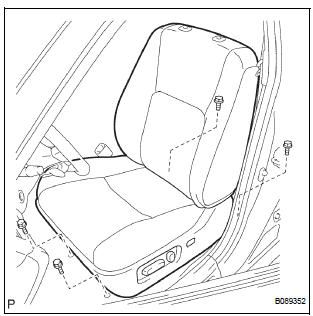
- Using a screwdriver, pry out the 2 seat track covers.
HINT: Tape the screwdriver tip before use.
- Disconnect the connectors under the seat.
- Remove the 4 bolts and the seat assembly.
NOTICE: Be careful not to damage the body.
 Front seat assembly (for Power Seat)
COMPONENTS
...
 Disassembly
1. REMOVE FRONT SEAT SIDE TABLE LEG COVER (w/
Table)
Using a screwdriver, disengage the claws and
remove the seat side table leg cover.
HINT:
Tape the screwdriver tip before use.
2. ...
Other materials:
Do-it-yourself service
precautions
If you perform maintenance yourself, be sure to follow the correct
procedure as given in these sections.
Items
Parts and tools
Battery condition
Warm water
Baking soda
Grease
Conventional wrench (for terminal clamp bolts)
Brake ...
Installation
1. INSTALL VENTILATION VALVE
(a) Install the ventilation valve.
(1) Apply adhesive to 2 or 3 threads.
Adhesive:
Part No. 08833-00070, Three Bond 1324 or
equivalent
(2) Install the ventilation valve.
Torque: 27 N*m (275 kgf*cm, 20 ft.*lbf)
2. CONNECT VENTILATION HOSE
(a) Connect ...
Removal
1. REMOVE FRONT FENDER LINER LH
2. REMOVE FRONT FENDER LINER RH
3. REMOVE FRONT BUMPER COVER
4. REMOVE FRONT BUMPER ENERGY ABSORBER
5. REMOVE FRONT BUMPER REINFORCEMENT SUBASSEMBLY
6. REMOVE LASER SENSOR
Disconnect the connector and remove the laser the
sensor.
...
