Toyota Sienna Service Manual: Installation
1. INSTALL VENTILATION VALVE
(a) Install the ventilation valve.
(1) Apply adhesive to 2 or 3 threads.
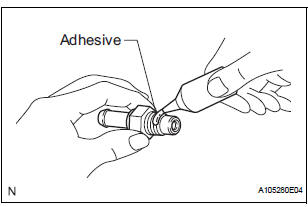
Adhesive: Part No. 08833-00070, Three Bond 1324 or equivalent
(2) Install the ventilation valve.
Torque: 27 N*m (275 kgf*cm, 20 ft.*lbf)
2. CONNECT VENTILATION HOSE
(a) Connect the ventilation hose to the ventilation valve.
3. INSTALL V-BANK COVER SUB-ASSEMBLY (See page EM-63)
 Inspection
1. INSPECT VENTILATION VALVE
(a) Install a clean hose to the ventilation valve.
(b) Check the ventilation valve operation.
(1) Blow air into the cylinder head side, and check
that air pass ...
 Air fuel ratio sensor (for 2wd)
Components
...
Other materials:
Air outlets
Location of air outlets
The air outlets and air volume
changes according to the
selected air flow mode.
Adjusting the position of and opening and closing the air outlets
Center outlets
Right and left side outlets
Turn the knob to open or close the vent.
Direct air f ...
ECU Power Source Circuit
DESCRIPTION
This is the power source for the tire pressure warning ECU.
WIRING DIAGRAM
INSPECTION PROCEDURE
NOTICE:
When replacing the tire pressure warning ECU, read the transmitter IDs
stored in the old ECU
using the intelligent tester and write them down before removal.
It is neces ...
Open in Occupant Classification ECU Battery
Positive Line
DTC B1794 Open in Occupant Classification ECU Battery
Positive Line
DESCRIPTION
This circuit consists of the occupant classification ECU and the power source
circuit (battery, fuse, wire
harness).
DTC B1794 is recorded when a malfunction is detected in the occupant
classification ECU or t ...
