
Toyota Sienna Service Manual: Removal
1. REMOVE REAR WINDOW SIDE GARNISH ASSEMBLY
2. REMOVE REAR DOOR WINDOW FRAME SUBASSEMBLY
3. REMOVE SIDE TRIM BOARD COVER REAR
4. REMOVE REAR DOOR TRIM BOARD SUBASSEMBLY
5. REMOVE REAR DOOR GLASS RUN
6. REMOVE SLIDE DOOR WINDOW ASSEMBLY
7. REMOVE REAR DOOR GLASS WEATHERSTRIP
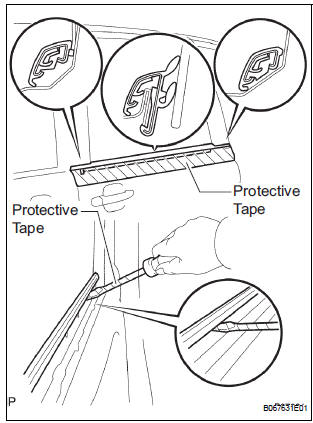
- Put protective tape under the rear door glass weatherstrip.
- Using a screwdriver or moulding remover, remove the rear door glass weatherstrip.
HINT: Tape the screwdriver tip before use.
 Rear door glass weatherstrip
COMPONENTS
...
 Installation
1. INSTALL REAR DOOR GLASS WEATHERSTRIP
Install the rear door glass weatherstrip.
2. INSTALL SLIDE DOOR WINDOW ASSEMBLY
3. INSTALL REAR DOOR GLASS RUN
4. INSTALL REAR DOOR TRIM BOARD SUBASSE ...
Other materials:
Adjustment
1. INSPECT SHIFT LEVER POSITION
(a) When shifting from P to R position only with ignition
switch ON and brake pedal, make sure that the
shifting lever moves smoothly and can be
moderately operated.
(b) When starting engine, make sure that the vehicle
moves forward when shifting from N to D p ...
Disassembly
1. REMOVE RADIATOR WATER INLET
(a) Remove the 2 bolts and radiator water inlet.
2. REMOVE DRAIN PLUG
(a) Remove the drain plug and air drain plug.
(b) Remove the 2 O-rings.
3. REMOVE LOWER RADIATOR TANK
(a) Install the claw to the overhaul handle, inserting it in
the hole in Part A ...
Camera Picture Error
DTC 5C-40 Camera Picture Error
DESCRIPTION
DTC No.
DTC Detection Condition
Trouble Area
5C-40
Synchronous signal from the camera cannot be
transmitted.
Wire harness
Television camera assembly
Radio and navigation assembly
...
