Toyota Sienna Service Manual: Removal
1. REMOVE BACK DOOR CENTER GARNISH (See page ET-18)
2. REMOVE POWER BACK DOOR ROD (See page ED- 220)
3. REMOVE BACK DOOR LH SIDE GARNISH
4. REMOVE BACK DOOR RH SIDE GARNISH
5. REMOVE BACK DOOR PULL STRAP (See page ED- 221)
6. REMOVE BACK DOOR TRIM BOARD ASSEMBLY
7. REMOVE LH BACK-UP LIGHT ASSEMBLY (See page LI-90)
8. REMOVE RH BACK-UP LIGHT ASSEMBLY (See page LI-90)
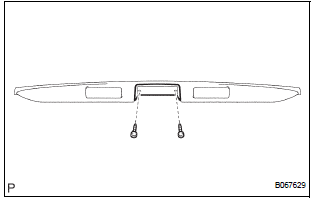
9. REMOVE BACK DOOR OUTSIDE GARNISH
- Disconnect the licence light connector.
- Remove the 5 nuts, clip and back door outside garnish sub-assembly.

- Remove the 2 screws and back door outside opener switch.
 Back door outside garnish
COMPONENTS
...
 Installation
1. INSTALL BACK DOOR OUTSIDE GARNISH
Install the back door outside opener switch with the
2 screws.
Install the back door outside garnish with the 5 nuts
and a clip.
Connect th ...
Other materials:
Calibrating the compass
The direction display deviates from the true direction determined by
the earth’s magnetic field. The amount of deviation varies according to
the geographic position of the vehicle.
If you cross over a map boundary shown in illustration, the compass will
deviate.
To obtain higher preci ...
Installation
1. INSTALL REAR NO. 1 SEAT ASSEMBLY CENTER
Place the seat in the cabin.
NOTICE:
Be careful not to damage the body.
Install the rear seat.
Install the seat belt anchor plate with the bolt.
Torque: 42 N*m (428 kgf*cm, 31 ft.*lbf)
Install the headrest.
...
Symptom confirmation and diagnostic trouble code
HINT:
The diagnostic system in the SIENNA has various
functions.
The first function is the Diagnostic Trouble Code
(DTC) check. A DTC is a code stored in the ECU
memory whenever a malfunction in the signal circuits
to the ECU occurs. In a DTC check, a previous
malfunction's DTC can be ...
