Toyota Sienna Service Manual: Data list / active test
1. DATA LIST
HINT: With the intelligent tester connected to the DLC3 and the ignition switch to the ON position, the ABS, TRAC and VSC data list can be displayed. Follow the prompts on the tester screen to access the DATA LIST.
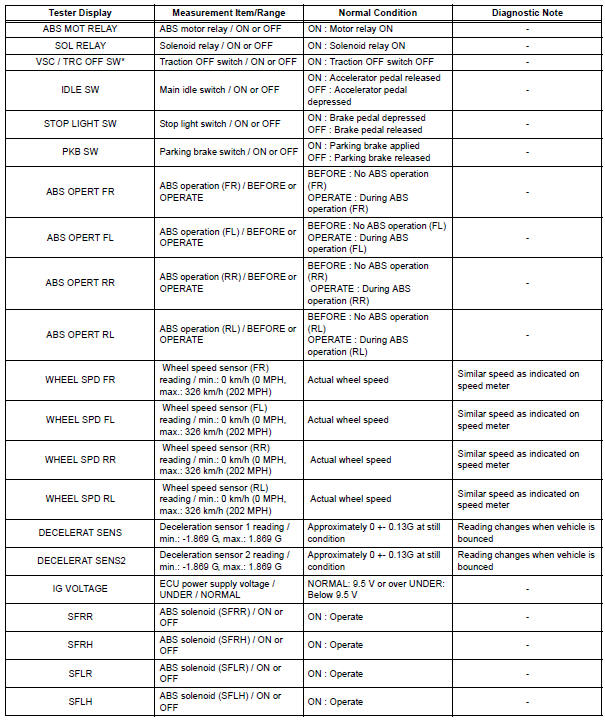
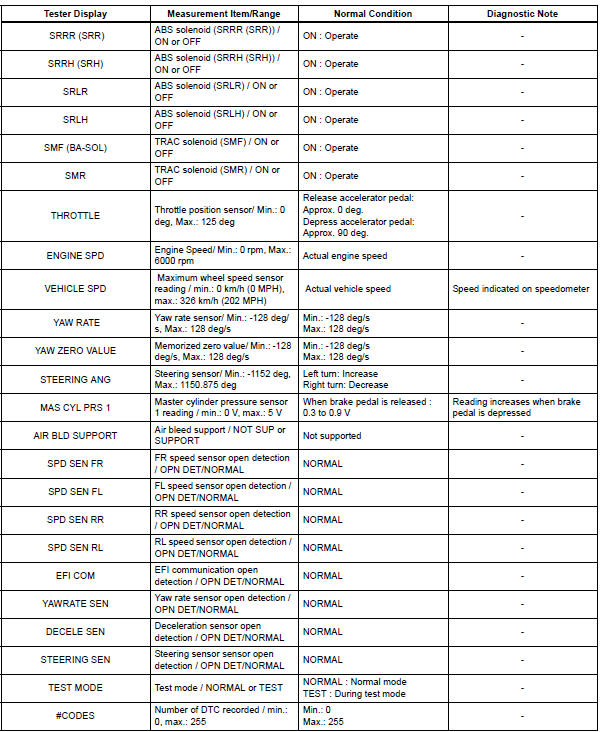
*: 2WD
2. ACTIVE TEST
HINT: Performing the ACTIVE TEST using the intelligent tester allows the relay and actuator, etc. to operate without removing any parts. Performing the ACTIVE TEST as the first step of troubleshooting is one of the methods to shorten labor time.
It is possible to display the DATA LIST during the ACTIVE TEST.
(a) Connect the intelligent tester to the DLC3.
(b) Turn the ignition switch to the ON position.
(c) According to the display on the tester, perform the "ACTIVE TEST".
HINT: Ignition switch must be turned to the ON position to proceed to the Active Test using the intelligent tester.
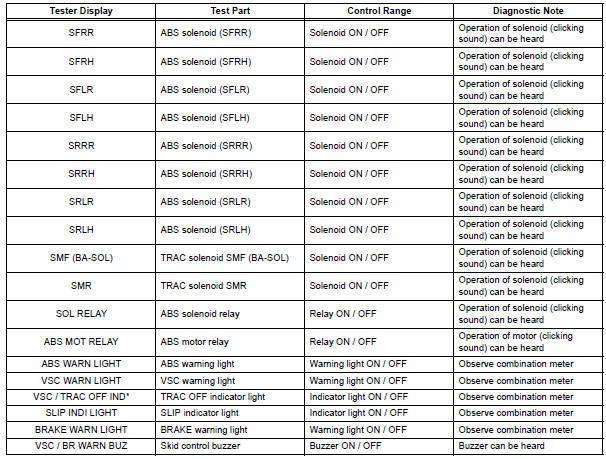
*: 2WD
 Freeze frame data
1. FREEZE FRAME DATA
(a) The vehicle (sensor) status, stored during ABS and/
or VSC operation or at the time of an error code
detection, can be displayed by the intelligent tester.
(b) Only one ...
 Diagnostic trouble code chart
HINT:
If a malfunction code is displayed during the DTC check,
check the circuit indicated by the DTC. For details of each
code, turn to the page for the respective "DTC Code" in the
DTC ...
Other materials:
Safety Connect LED light Indicators
When the engine switch is turned to the “ON” position (vehicles without
a smart key system) or IGNITION ON mode (vehicles with a smart
key system), the red indicator light comes on for 2 seconds then turns
off. Afterward, the green indicator light comes on, indicating that the
service is act ...
If the engine will not
start
If the engine will not start even though correct starting procedures
are being followed (, 228), consider each of the following
points:
The engine will not start even though the starter motor operates
normally.
One of the following may be the cause of the problem:
There may not be sufficien ...
Precaution
1. Before operating the power rear no. 2 seat with
stowing function, make sure that there is nothing in
the path of the seat.
CAUTION:
If someone or something is caught between the seat
and other parts, injury or damage may result.
If the system detects that the folding motor is locke ...
