Toyota Sienna Service Manual: Data list / active test
1. DATA LIST
HINT: Using the intelligent tester to read the Data List allows the values or states of switches, sensors, actuators and other items to be read without removing any parts. This non-intrusive inspection can be very useful because intermittent conditions or signals may be discovered before parts or wiring is disturbed. Reading the Data List information early in troubleshooting is one way to save diagnostic time.
(a) Connect the intelligent tester to the DLC3.
(b) Turn the ignition switch to the ON position.
(c) From the display on the tester, read the "DATA LIST".
AIR CONDITIONER / DATA LIST
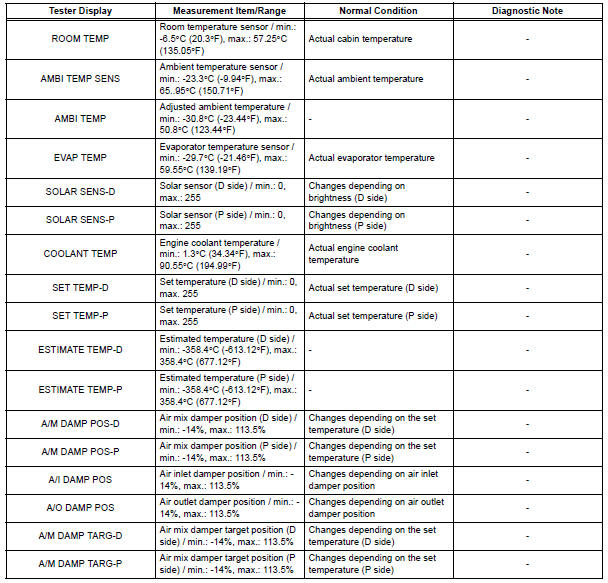
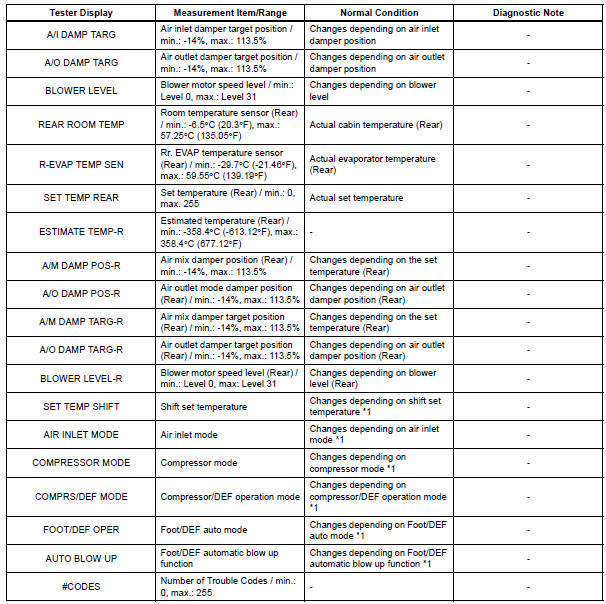
HINT: *1: It differs depending on the user setting.
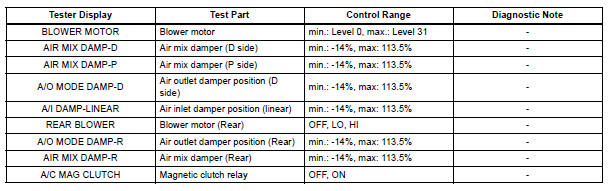
2. ACTIVE TEST
HINT: Using the intelligent tester to perform Active Tests allows relays, VSVs, actuators and other items to be operated without removing any parts. This non-intrusive functional inspection can be very useful because intermittent operation may be discovered before parts or wiring is disturbed. Performing Active Tests early in troubleshooting is one way to save diagnostic time. Data List information can be displayed while performing Active Tests.
(a) Connect the intelligent tester to the DLC3.
(b) Turn the ignition switch to the ON position.
(c) From the display on the tester, read the "ACTIVE TEST".
 Check mode procedure
1. LIST OF OPERATION METHODS
By operating each of the A/C control switches as shown
in the diagram below, it is possible to enter the diagnosis
check mode.
...
 Diagnostic trouble code chart
If a trouble code is displayed during the DTCs check (sensor
check), check the circuit listed for the code in the table below
(Proceed to the page given for that circuit).
AIR CONDITIONING SYSTEM
...
Other materials:
Calculation formula for your vehicle
Cargo capacity
Total load capacity (vehicle capacity weight)
When 2 people with the combined weight of A lb. (kg) are riding in
your vehicle, which has a total load capacity (vehicle capacity weight)
of B lb. (kg), the available amount of cargo and luggage load capacity
will be C lb. ...
Memory recall function
Each electronic key can be registered to recall your preferred driving
position.
Registering procedure
Record your driving position to button “1” or “2” before performing
the following:
Carry only the key you want to register, and then close the driver’s
door.
If 2 or more keys ar ...
Inspection
1. INSPECT MAGNETIC CLUTCH CLEARANCE
(a) Set the dial indicator to the magnetic clutch hub.
(b) Connect the battery positive lead to the terminal 1 of
the magnet clutch connector and the negative lead
to the earth wire. Turn on and off the magnetic
clutch and measure the clearance.
Stand ...
