Toyota Sienna Service Manual: Disassembly
1. FIX FRONT SHOCK ABSORBER WITH COIL SPRING
(a) Install 2 nuts and a bolt to the bracket at the lower side of the front shock absorber with coil spring and secure it in a vise.
2. REMOVE FRONT SUSPENSION SUPPORT SUBASSEMBLY LH
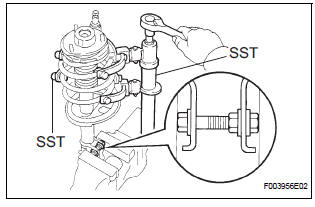
(a) Using SST, compress the front coil spring LH
SST 09727-30021 (09727-00010, 09727-00021, 09727-00031)
NOTICE: Do not use an impact wrench. It will damage the SST.
HINT: Use 2 SST of the same type.
(b) Remove the lock nut and the front suspension support sub-assembly
3. REMOVE FRONT SUSPENSION SUPPORT LH BEARING
4. REMOVE FRONT COIL SPRING SEAT UPPER LH
5. REMOVE FRONT COIL SPRING INSULATOR UPPER LH
6. REMOVE FRONT COIL SPRING LH
7. REMOVE FRONT SPRING BUMPER LH
8. REMOVE FRONT COIL SPRING INSULATOR LOWER LH
9. REMOVE SHOCK ABSORBER ASSEMBLY FRONT LH
 Removal
1. Remove front wheel
2. Remove front wiper arm head cap
Hint:
(see page ww-3)
3. Remove fr wiper arm rh
HINT:
(See page WW-3)
4. Remove fr wiper arm lh
HINT:
(See page WW-3)
5. Remove cowl ...
 Inspection
1. INSPECT SHOCK ABSORBER ASSEMBLY FRONT LH
(a) Compress and extend the shock absorber rod and
check that there is no unusual resistance or unusual
sound during operation.
If there is any ab ...
Other materials:
Engine oil
With the engine at operating temperature and turned off, check the oil
level on the dipstick.
Checking the engine oil
Park the vehicle on level ground. After warming up the engine
and turning it off, wait more than 5 minutes for the oil to drain
back into the bottom of the engine.
Ho ...
Removal
1. Remove engine under cover no.1
2. Disconnect cable from negative battery
terminal
3. Drain automatic transaxle fluid (see page
ax-131)
4. Remove automatic transaxle oil pan subassembly
(a) Remove the 18 bolts, oil pan and gasket.
NOTICE:
Some fluid will remain in the oil pan. ...
Removal
1. REMOVE ROOF HEADLINING ASSEMBLY
2. REMOVE SLIDING ROOF SIDE GARNISH LH
Disengage the 3 claws.
Disengage the rear clip.
Disengage the front clip.
Remove the slide garnish by pulling it rearward.
3. REMOVE SLIDING ROOF SIDE GARNISH RH
HINT:
Use the same procedures described abov ...
