Toyota Sienna Service Manual: Half Connection in Center Airbag Sensor Assembly Connectors
DTC B1135/24 Half Connection in Center Airbag Sensor Assembly Connectors
DESCRIPTION
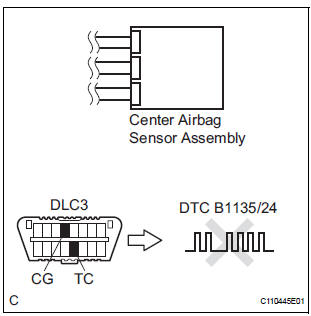
The center airbag sensor assembly connector has a mechanism that electrically detects half connection.
The center airbag sensor assembly monitors the voltage applied to the disconnection detection pins and detects half connection.
DTC B1135/24 is recorded when the center airbag sensor assembly detects an open circuit in the electrical connection check mechanism of the airbag sensor connector or in the airbag sensor circuit.
|
DTC No. |
DTC Detecting Condition |
Trouble Area |
| B1135/24 |
|
|
INSPECTION PROCEDURE
1 CHECK CENTER AIRBAG SENSOR ASSEMBLY CONNECTOR
- Turn the ignition switch to the LOCK position.
- Disconnect the negative (-) terminal cable from the battery, and wait for at least 90 seconds.
- Check the connection of the center airbag sensor assembly connectors.
OK: The connectors are connected. HINT: When the connectors are not firmly connected, disconnect them once and reconnect them securely

2 CHECK CENTER AIRBAG SENSOR ASSEMBLY
- Connect the negative (-) terminal cable to the battery, and wait for at least 2 seconds.
- Turn the ignition switch to the ON position, and wait for at least 60 seconds.
- Clear the DTCs stored in memory (5).
- Turn the ignition switch to the LOCK position.
- Turn the ignition switch to the ON position, and wait for at least 60 seconds.
- Check the DTCs (5).
OK: DTC B1135/24 is not output. HINT: Codes other than code B1135/24 may be output at this time, but they are not related to this check.
 Go to step 3

END
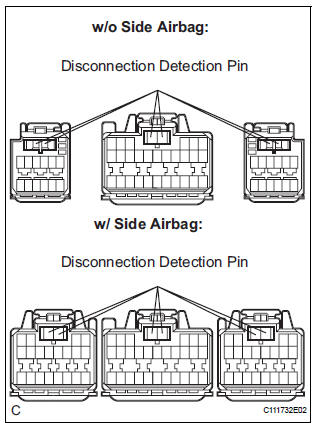
3 PERFORM VISUAL CHECK OF DISCONNECTION DETECTION PIN
- Turn the ignition switch to the LOCK position.
- Disconnect the negative (-) terminal cable from the battery, and wait for at least 90 seconds.
- Disconnect the connectors from the center airbag sensor assembly.
- Check the disconnection detection pin of the connector.
HINT: Compare one connector with the other 2 connectors. OK: No deformation is identified.
 REPAIR OR REPLACE CENTER
AIRBAG
SENSOR ASSEMBLY CONNECTOR
REPAIR OR REPLACE CENTER
AIRBAG
SENSOR ASSEMBLY CONNECTOR

REPLACE CENTER AIRBAG SENSOR ASSEMBLY
 Center Airbag Sensor Assembly Malfunction
DTC B1100/31 Center Airbag Sensor Assembly Malfunction
DESCRIPTION
The center airbag sensor assembly consists of the center airbag sensor
assembly, safing sensor, drive
circuit, diagnosis circuit ...
 Side Airbag Sensor Assembly RH Circuit Malfunction
DTC B1140/32 Side Airbag Sensor Assembly RH Circuit Malfunction
DESCRIPTION
The side airbag sensor RH circuit consists of the center airbag sensor
assembly and side airbag sensor
RH.
If the ce ...
Other materials:
No. 1 Ultrasonic sensor
COMPONENTS
REMOVAL
1. REMOVE FRONT FENDER LINER LH
2. REMOVE FRONT FENDER LINER RH
3. REMOVE FRONT BUMPER COVER
4. REMOVE REAR BUMPER COVER (2)
5. REMOVE NO. 1 ULTRASONIC SENSOR RETAINER
Remove the No. 1 ultrasonic sensor retainer as
shown in the illustration
6. REMOVE ...
Indicator Circuit
DESCRIPTION
This system has two indicator lights. One of the indicator lights is built
into the fold seat switch. This
indicator light receives power from the fold seat control ECU. It comes on or
blinks when the system
detects that an object is caught or when the seat operation conditions ar ...
Removal
1. DISCONNECT CABLE FROM NEGATIVE BATTERY
TERMINAL
CAUTION:
Wait for 90 seconds after disconnecting the cable to prevent the airbag working
2. REMOVE FRONT SEAT ASSEMBLY
HINT:
Refer to the instructions for removal of the front seat assembly (for
flat type).
Refer to the ins ...
