Toyota Sienna Service Manual: Headlight leveling switch
ON-VEHICLE INSPECTION
1. HEADLIGHT LEVELING SWITCH
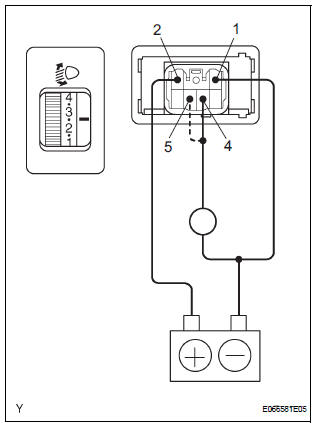
- Connect the battery positive (+) lead to the terminal 1 and the battery negative (-) lead to the terminal 5.
- Measure the resistance between the terminal 4 and the battery negative (-) lead when headlight leveling switch is operated.
- Measure the resistance between the terminal 5 and the battery negative (-) lead when headlight leveling switch is operated.
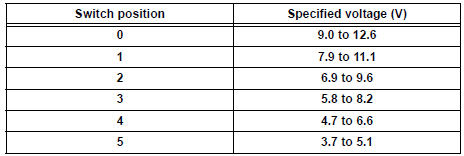
Voltage
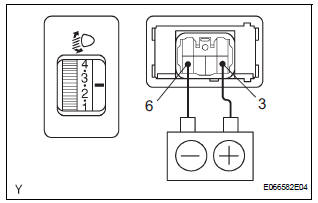
- Inspect switch illumination.
- Connect the battery positive (+) lead to the terminal 3 and the battery negative (-9 lead to the terminal 6, and check that the illumination comes on.
 Hazard warning switch
INSPECTION
1. HAZARD WARNING SIGNAL SWITCH ASSEMBLY
Check that there is resistance between the
terminals at each switch position as shown in the
chart.
Resistance
Inspect ...
 Stop light switch
ON-VEHICLE INSPECTION
1. STOP LIGHT SWITCH ASSEMBLY
Check the resistance between the terminals at each
switch position as shown ion the chart.
Resistance
...
Other materials:
Reassembly
1. INSTALL INSTR PNL PASS L/DOOR AIR BAG
ASSEMBLY
2. INSTALL INSTRUMENT PANEL WIRE NO.2
3. INSTALL NAVIGATION ANTENNA ASSEMBLY
4. INSTALL ANTENNA CORD SUB-ASSEMBLY
5. INSTALL INSTRUMENT PANEL BOX DOOR SUBASSEMBLY
NO.2
6. INSTALL INSTRUMENT PANEL FINISH PANEL
RETAINER NO.1
7. INSTALL INSTRUM ...
Removal
1. REMOVE REAR WINDOW SIDE GARNISH
ASSEMBLY
2. REMOVE REAR DOOR WINDOW FRAME SUBASSEMBLY
3. REMOVE SIDE TRIM BOARD COVER REAR
4. REMOVE REAR DOOR TRIM BOARD SUBASSEMBLY
5. REMOVE REAR DOOR GLASS RUN
6. REMOVE SLIDE DOOR WINDOW ASSEMBLY
7. REMOVE REAR DOOR GLASS WEATHERSTRIP
Put pro ...
Replying to a message
Display the message inbox screen.
Select the desired message from the list.
Select “Quick Message”.
Select the desired message.
Select “Send”.
If an error message is displayed, follow the guidance on the screen to try
again.
Editing quick reply message
Select “Quick ...
