
Toyota Sienna Service Manual: Inspection
1. INSPECT STEERING PAD SWITCH LH (w/o Navigation System)
- Measure the resistance according to the values in the table below.
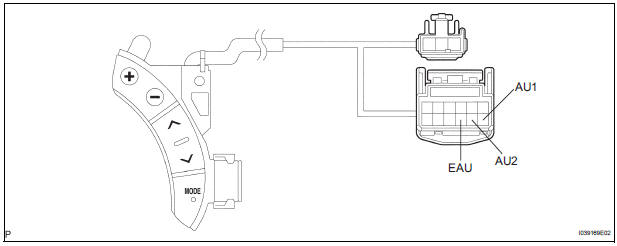
Standard resistan
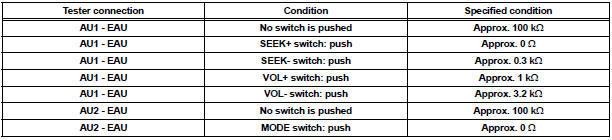
If the result is not as specified, replace the steering pad switch LH.
2. INSPECT STEERING PAD SWITCH RH (w/ Navigation System)
- Measure the resistance according to the value(s) in the table below.
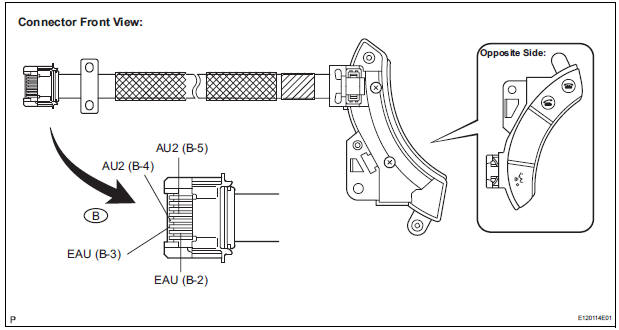
Standard resistance
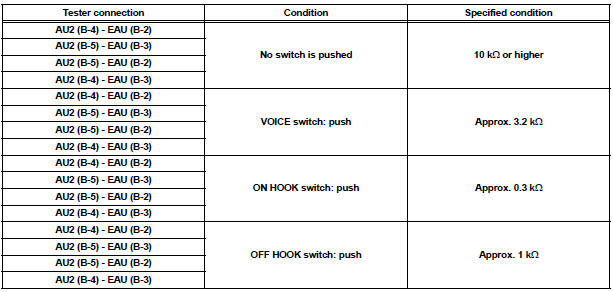
If the result is not as specified, replace the steering pad switch RH.
3. INSPECT STEERING PAD SWITCH CABLE (w/ Navigation System)
- Measure the resistance according to the value(s) in the table below.
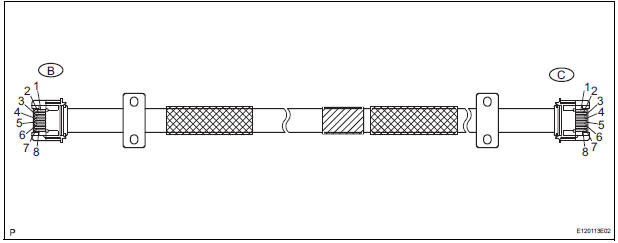
Standard resistance
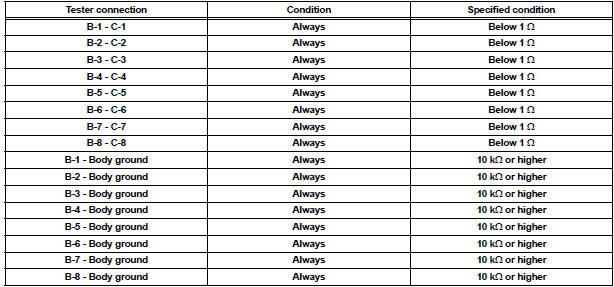
If the result is not as specified, replace the steering pad switch cable.
 Removal
1. DISCONNECT CABLE FROM NEGATIVE BATTERY TERMINAL
2. REMOVE STEERING WHEEL NO. 2 LOWER COVER
3. REMOVE STEERING WHEEL NO. 3 LOWER COVER
4. REMOVE HONE BUTTON ASSEMBLY
5. REMOVE STEERING PAD SWITC ...
 Installation
1. INSTALL STEERING PAD SWITCH LH
2. INSTALL HONE BUTTON ASSEMBLY
3. INSTALL STEERING WHEEL NO. 3 LOWER COVER
4. INSTALL STEERING WHEEL NO. 2 LOWER COVER
5. CONNECT CABLE TO NEGATIVE BATTERY
TERM ...
Other materials:
Room light assembly
ON-VEHICLE INSPECTION
1. ROOM LIGHT ASSEMBLY NO.2
Check that the resistance exists between the
terminals.
Resistance:
Below 1 Ω
2. INTERIOR DOME LIGHT SWITCH ASSEMBLY
Check that there is resistance between the
terminals at each switch position as shown in the
cha ...
Front wheel alignment
Adjustment
NOTICE:
For vehicles equipped with VSC, if wheel alignment has
been adjusted, and if suspension or underbody
components have been removed/installed or replaced, be
sure to perform the following initialization procedure in
order for the system to function normally:
1. Disconnect the ...
Removal
1. DISCONNECT CABLE FROM NEGATIVE BATTERY
TERMINAL
2. REMOVE V-BANK COVER SUB-ASSEMBLY (See
page EM-28)
3. REMOVE PURGE VSV
(a) Disconnect the purge VSV connector.
(b) Disconnect the 2 purge line hoses from the purge
VSV.
(c) Remove the purge VSV from the air cleaner hose.
(d) R ...
