Toyota Sienna Service Manual: Inspection
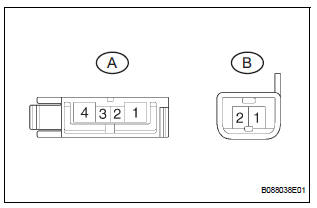
1. INSPECT SEAT HEATER SWITCH LH
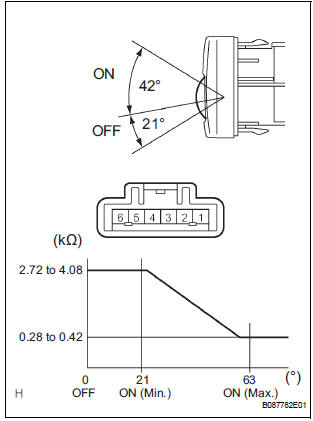
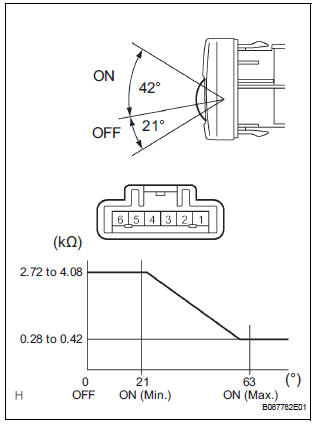
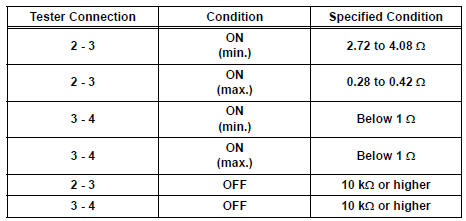
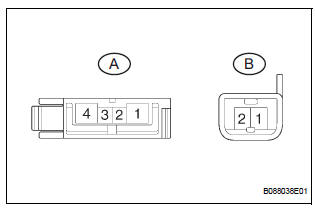
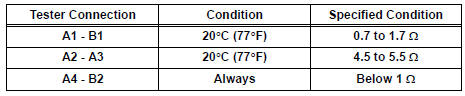
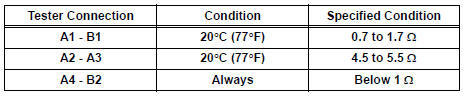
- Measure the resistance of the seat heater switch when the switch is operated.
Resistance
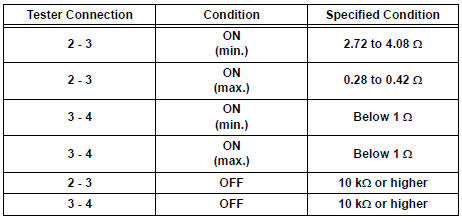
If the result is not as specified, replace the switch.
HINT: As the dial is being turned, the resistance changes gradually.
- Push the seat heater switch ON and check that the
seat heater switch indicator illuminates when the
switch is operated.
OK

If the result is not as specified, replace the switch.
- Check the seat heater switch illumination.
OK

If the result is not as specified, replace the seat heater switch or bulb.
2. INSPECT SEAT HEATER SWITCH RH
- Measure the resistance of the seat heater switch when the switch is operated.
Resistance
If the result is not as specified, replace the switch.
HINT: As the dial is being turned, the resistance changes gradually.
- Push the seat heater switch ON and check that the seat heater switch indicator illuminates when the switch is operated.
OK

If the result is not as specified, replace the switch.
- Check the seat heater switch illumination.
OK

If the result is not as specified, replace the seat heater switch or bulb.
3. INSPECT FRONT SEAT BACK HEATER ASSEMBLY LH
- Measure the resistance of the seatback heater.
Resistance

If the result is not as specified, replace the seatback heater assembly.
4. INSPECT FRONT SEAT BACK HEATER ASSEMBLY RH
- Measure the resistance of the seatback heater.
Resistance

If the result is not as specified, replace the seatback heater assembly.
5. INSPECT FRONT SEAT CUSHION HEATER ASSEMBLY LH
- Measure the resistance of the seat cushion heater.
Resistance
If the result is not as specified, replace the seat cushion heater assembly.
6. INSPECT FRONT SEAT CUSHION HEATER ASSEMBLY RH
- Measure the resistance of the seat cushion heater.
Resistance
If the result is not as specified, replace the seat cushion heater assembly.
 On-vehicle inspection
1. CHECK SEAT HEATER CONTROL (WIRE HARNESS
SIDE)
Disconnect the connector from the seat heater
control.
Measure the voltage and resistance of each
terminal of the wire harne ...
 Front seat assembly (for Flat Type)
COMPONENTS
...
Other materials:
Lost Communication with Steering Angle Sensor
Module
DTC U0126 Lost Communication with Steering Angle Sensor
Module
DESCRIPTION
This circuit detects the angle and direction of the steering wheel and
automatically transmits a signal to
the skid control ECU and distance control ECU.
DTC No.
DTC Detection Condition
Trouble ...
Preparation 2gr-fe cooling
SST
RECOMMENDED TOOLS
EQUIPMENT
COOLANT
Capacity
Classification
11.3 liters (12.0 US qts, 10.0 Imp. qts)
Use only "TOYOTA Super Long Life Coolant" or similar high quality
ethylene glycol based non-silicate, non-amine, non-nitrite, non-borate
coolant ...
Pressure Control Solenoid "D" Performance (Shift
Solenoid Valve SLT)
SYSTEM DESCRIPTION
The linear solenoid valve (SLT) controls the transmission line pressure for
smooth transmission operation
based on signals from the throttle position sensor and the vehicle speed sensor.
The ECM adjusts the
duty ratio (*) of the SLT solenoid valve to control hydraulic line ...
