Toyota Sienna Service Manual: Installation
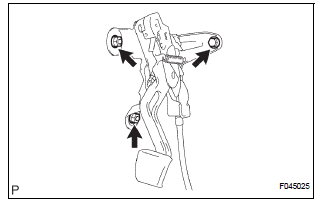
1. INSTALL PARKING BRAKE CONTROL PEDAL ASSEMBLY

(a) Install the parking brake control pedal assembly with a bolt and the 2 nuts.
Torque: 39 N*m (398 kgf*cm, 29 ft.*lbf) (b) Connect the parking brake switch connector.
(c) Connect the instrument panel junction block assembly w/ wiring harness connector with the 4 nuts.
Torque: 7.3 N*m (74 kgf*cm, 65 in.*lbf)
2. INSTALL REAR FLOOR SEAT LOCK COVER
3. INSTALL REAR FLOOR SEAT LOCK COVER
4. INSTALL REAR SEAT NO.1 ASSEMBLY
HINT:
- Captain Seat Type (See page SE-75)
- Center Seat Type (See page SE-82)
5. INSTALL FRONT SEAT ASSEMBLY LH
HINT:
- Manual Seat Type (See page SE-55)
- Power Seat Type (See page SE-66)
- Fold Flat Type (See page SE-45)
6. INSPECT PARKING BRAKE PEDAL TRAVEL (See page PB-1)
7. ADJUST PARKING BRAKE PEDAL TRAVEL (See page PB-1)
 Reassembly
1. INSTALL PARKING BRAKE SWITCH ASSEMBLY
(a) Install the parking brake switch to the parking brake
pedal with the screw.
2. INSTALL PARKING BRAKE CABLE ASSEMBLY NO.1
(a) Connect the parking brake ...
 Parking brake cable
Components
...
Other materials:
Rear window wiper and
washer
Operating the wiper lever
Turning the end of the lever turns on the rear window wiper and
washer.
The illustration is intended as an example.
*1 or
*2
Intermittent window
wiper operation
*1 or
*2
Normal window wiper
operation
Washer/wiper dual operation
Washer/wiper du ...
Automatic transaxle unit
COMPONENTS
...
Problem symptoms table
HINT:
Use the table below to help determine the cause of the
problem symptoms. The potential causes of the symptoms
are listed in order of probability in the ''Suspected Area''
column of the table. Check each symptom by checking the
suspected areas in the order they are listed. Rep ...
