Toyota Sienna Service Manual: Installation
1. INSTALL BACK DOOR GLASS
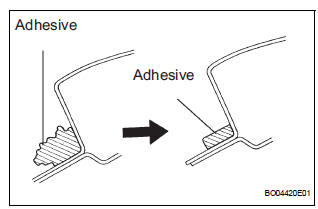
- Clean and shape the contact surface of the vehicle body.
- Using a knife, cut away any rough adhesive on
the contact surface of the body to ensure the
appropriate surface shape.
HINT: Leave as much adhesive on the body as possible.
- Clean the contact surface of the body with a
shop rag saturated with cleaner.
HINT: Even if all the adhesive has been remove, clean the body.
- Using a brush, coat the exposed part of the body on the vehicle side with Primer M.
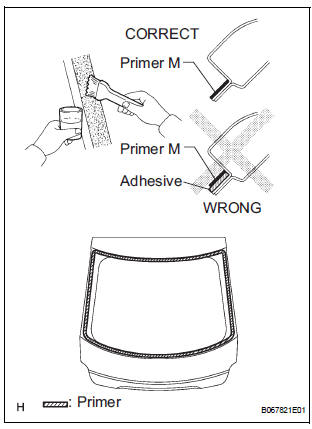
NOTICE:
- Allow the primer coating to dry for 3 minutes or more.
- Do not coat the adhesive with Primer M.
- Do not keep any of the opened Primer M for later use.
- Using a brush or sponge, coat the edge of the glass and the contact surface with Primer G.
HINT: If an area other than that specified is coated by accident, wipe of the primer with a clean shop rag before it dries.
NOTICE:
- Allow the primer coating to dry for 3 minutes or more.
- Do not keep any of the opened Primer G for later use.
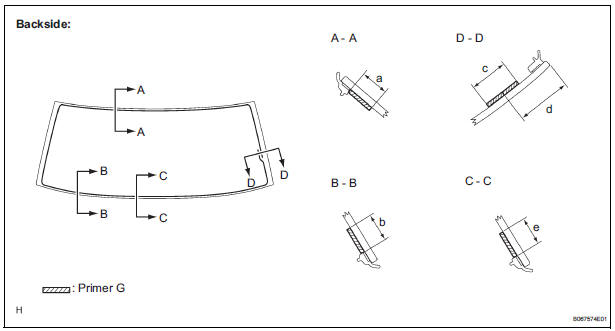
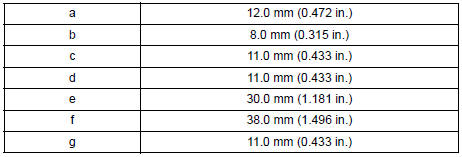
Dimensions:
- Apply adhesive.
Adhesive: Part No. 08850-00801 or equivalent
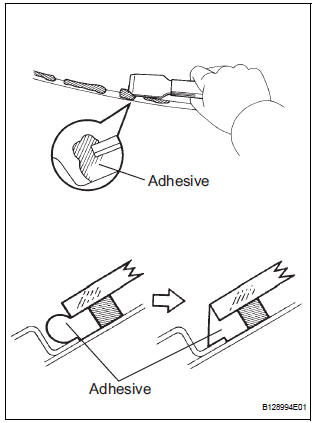
- Cut off the tip of the cartridge nozzle, as shown in the illustration.
HINT: After cutting off the tip, use all adhesive within the time described in the table below.
Tackfree time

- Load the sealer gun with the cartridge.
- Coat the glass with adhesive, as shown in the illustration.
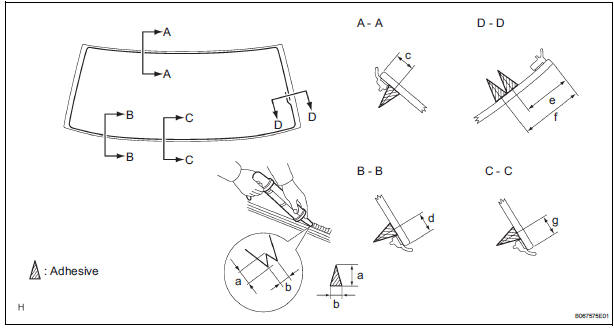
Dimensions:
- Install the glass to the body.
- Hold the back window glass in place securely with tape or equivalent to the body until the adhesive has hardened.
NOTICE:
- Allow the primer coating to dry for 3 minutes or more.
- Check that the clips are attached to the body correctly.
- Check the clearance between the body and glass.
- Lightly press the front surface of the glass to ensure a close fit.
- Using a scraper, remove any excess or protruding adhesive.
HINT: Apply adhesive onto the glass rim.
NOTICE: Take care not to drive the vehicle for the time described in the table below.
Minimum time

2. CHECK FOR LEAKAGE AND REPAIR
- Conduct a leak test after the adhesive has completely hardened.
- Seal any leaks with auto glass sealer.
3. INSTALL REAR WIPER MOTOR AND BRACKET ASSEMBLY
4. INSTALL REAR WIPER ARM
5. INSTALL FRONT WIPER ARM HEAD CAP
6. INSTALL REAR SPOILER COVER (W/ REAR SPOILER)
7. INSTALL BACK DOOR SERVICE HOLE PLATE
8. INSTALL BACK DOOR TRIM BOARD ASSEMBLY
9. INSTALL BACK DOOR PULL STRAP
10. INSTALL BACK DOOR STRAP COVER
11. INSTALL BACK DOOR SIDE GARNISH RH
12. INSTALL BACK DOOR SIDE GARNISH LH
13. INSTALL BACK DOOR GARNISH CENTER
 Removal
1. REMOVE BACK DOOR GARNISH CENTER
2. REMOVE BACK DOOR SIDE GARNISH LH
3. REMOVE BACK DOOR SIDE GARNISH RH
4. REMOVE BACK DOOR STRAP COVER
5. REMOVE BACK DOOR PULL STRAP
6. REMOVE BACK DOOR TRIM ...
 Window defogger system
PARTS LOCATION
...
Other materials:
CD Player Mechanical Error/ CD Insertion and Ejection Error/ CD Reading
Abnormal/ CD Changer Mechanical Error/ CD Insertion and Ejection Error/ CD
Reading Abnormal
DTC 62-10 CD Player Mechanical Error
DTC 62-11 CD Insertion and Ejection Error
DTC 62-12 CD Reading Abnormal
DTC 63-10 CD Changer Mechanical Error
DTC 63-11 CD Insertion and Ejection Error
DTC 63-12 CD Reading Abnormal
DESCRIPTION
DTC No.
DTC Detecting Condition
Troub ...
Driving tips
Winter driving tips
Carry out the necessary preparations and inspections before
driving the vehicle in winter. Always drive the vehicle in a manner
appropriate to the prevailing weather conditions.
Preparation for winter
Use fluids that are appropriate to the prevailing outside temperatures. ...
Cruise Main Indicator Light Circuit
DESCRIPTION
When the cruise control main switch is on, the CRUISE main indicator light
and READY indicator light
come on. This indicates the control condition (presence or absence of a vehicle
in front, vehicle-to-vehicle
distance, and set vehicle speed) and fail-safe state through the multip ...
