Toyota Sienna Service Manual: Installation
1. INSTALL REAR NO. 2 SEAT ASSEMBLY LH
- Place the rear No. 2 seat assembly LH in the cabin.
NOTICE: Be careful not to damage the body.
- Install the rear No. 2 seat assembly LH with the 2
bolts.
Torque: 29 N*m (296 kgf*cm, 21 ft.*lbf)
- Install the locus cable with the bolt.
Torque: 29 N*m (296 kgf*cm, 21 ft.*lbf)
- Install the 2 headrests.
HINT: Check that the seat leg locks.
2. INSTALL REAR SEAT LEG SIDE GARNISH SUBASSEMBLY LH
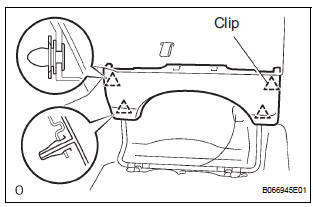
- Engage the clips to install the rear seat leg side garnish sub-assembly.
 Reassembly
1. INSTALL REAR SEAT STAY SUB-ASSEMBLY
Install the rear seat stay sub-assembly with the nut.
Torque: 5.5 N*m (56 kgf*cm, 49 in.*lbf)
2. INSTALL NO. 2 SEAT CUSHION SPRING ASSEMBLY
LH
3 ...
 Rear no. 2 Seat assembly (for Manual Seat Type RH Side)
COMPONENTS
...
Other materials:
PBD Pulse Sensor Malfunction
DTC B2222 PBD Pulse Sensor Malfunction
DESCRIPTION
A pulse sensor is built into the back door for a jam and foreign
object detection and for back door
position detection. The jam and foreign object detection feature of the
pulse sensor monitors the
operating speed of the back door whi ...
Settings display
The settings of the following items can be changed, refer to
Language
Select to change the language on the display.
Units
Select to change the unit for measure of the fuel consumption and
outside temperature.
Eco Driving Indicator Light
Select to activate/deactivate the Eco Driving ...
List of storage features
Auxiliary boxes
Cup holders
Door pockets
Bottle holders
Glove boxes
Console box (if equipped)
WARNING
Do not leave glasses, lighters or spray cans in the storage
spaces, as this
may cause the following when cabin temperature becomes high:
Glas ...
