Toyota Sienna 2010-2026 Owners Manual: Installing the spare tire

- Remove any dirt or foreign matter
from the wheel contact surface.
If foreign matter is on the wheel contact surface, the wheel nuts may loosen while the vehicle is in motion, causing the tire to come off.
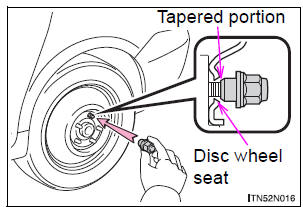
- Install the tire and loosely
tighten each wheel nut by hand
by approximately the same
amount.
Tighten the wheel nuts until the tapered portion comes into loose contact with the disc wheel seat.
- Lower the vehicle.
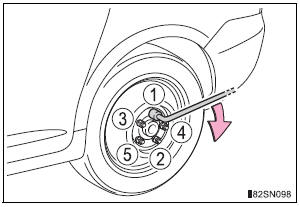
- Firmly tighten each wheel nut
two or three times in the order
shown in the illustration.
Tightening torque: 76 ft•lbf (103 N•m, 10.5 kgf•m)
- Stow the flat tire, tire jack and all tools.
 Replacing a flat tire
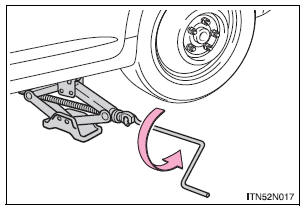
Chock the tires.
Slightly loosen the wheel nuts
(one turn).
Turn the tire jack portion A by
hand until the notch of the jack
is in contact with the jack point.
T ...
 Stowing the flat tire
Take out the strap and tire bag.
Place tire standing up in rear
tub, after putting the tire in the
tire bag.
Clip clasp to outboard hook.
Clip other clasp to c ...
Other materials:
Check for open circuit
(a) For an open circuit in the wire harness in Fig. 1, the resistance or
voltage, as described below.
(b) Check the resistance.
Check the resistance
Standard resistance (Fig. 2)
HINT:
Measure the resistance while lightly shaking the
wire harness vertically and horizontally. I ...
Precaution
1. INSPECTION PROCEDURE FOR VEHICLE INVOLVED
IN ACCIDENT
Perform the zero point calibration and sensitivity
check if any of the following conditions occur.
The occupant classification ECU is replaced.
Accessories (seatback tray and seat cover, etc.)
are installed.
...
Open in Front Pretensioner Squib RH Circuit
DTC B0131/64 Open in Front Pretensioner Squib RH Circuit
DESCRIPTION
The front pretensioner squib RH circuit consists of the center airbag sensor
assembly and the front seat
outer belt assembly RH.
This circuit instructs the SRS to deploy when deployment conditions are met.
DTC B0131/64 i ...
