Toyota Sienna 2010-2026 Owners Manual: Replacing a flat tire

- Chock the tires.

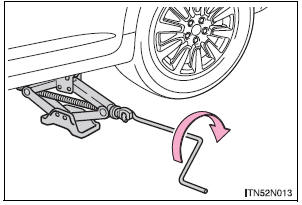
- Slightly loosen the wheel nuts (one turn).
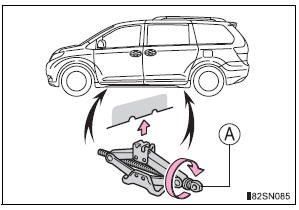
- Turn the tire jack portion A by
hand until the notch of the jack
is in contact with the jack point.
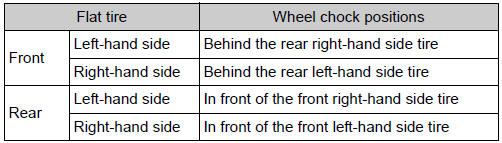
The jack point guides are located on the side of rocker moulding.
They indicate the jack point positions.
- Raise the vehicle until the tire is slightly raised off the ground.
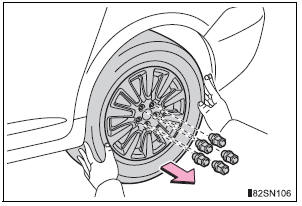
- Remove all the wheel nuts and
the tire.
When resting the tire on the ground, place the tire so that the wheel design faces up to avoid scratching the wheel surface.
| WARNING Replacing a flat tire
|
 Taking out the spare tire
Slide the front passenger’s seat to the frontmost lock position and
the right side second seat to the rearmost lock position so they will
not interfere with the jack handle.
Open the ri ...
 Installing the spare tire
Remove any dirt or foreign matter
from the wheel contact surface.
If foreign matter is on the wheel
contact surface, the wheel nuts
may loosen while the vehicle is in
motion, causing ...
Other materials:
Data list / active test
1. DATA LIST
HINT:
Using the intelligent tester to read the Data List allows
the values or states of switches, sensors, actuators and
other items to be read without removing any parts. This
non-intrusive inspection can be very useful because
intermittent conditions or signals may be discovered ...
Engine immobilizer
system
The vehicle’s keys have built-in transponder chips that prevent
the engine from starting if a key has not been previously registered
in the vehicle’s on-board computer.
Never leave the keys inside the vehicle when you leave the vehicle.
This system is designed to help prevent vehicle the ...
Trailer towing tips
Your vehicle will handle differently when towing a trailer. Help to avoid
an accident, death or serious injury, keep the following in mind when
towing:
Speed limits for towing a trailer vary by state or province. Do
not
exceed the posted towing speed limit.
Toyota recommends that the ve ...
