
Toyota Sienna Service Manual: On-vehicle inspection
1. CHECK RADIATOR RESERVOIR CAP SUBASSEMBLY
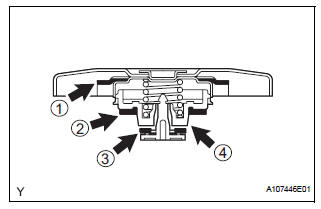
a) Measure the valve opening pressure.
(1) If there are water stains or foreign matter on rubber packings 1, 2 or 3, clean the part(s) with water and finger scouring.
(2) Check that rubber packings 1, 2 and 3 are not deformed, cracked or swollen.
(3) Check that rubber packings 3 and 4 are not stuck together.
(4) Apply engine coolant to rubber packings 2 and 3 before using the radiator cap tester.
(5) When using the cap tester, tilt it to 30° or more above the horizontal.
(6) Pump the cap tester several times, and check the maximum pressure*.
Pump speed: 1 pump per second
*: Even if the cap cannot maintain the maximum pressure, it is not a defect.

Judgment criterion
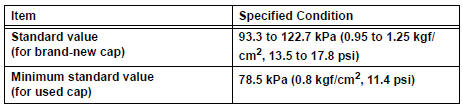
If the maximum pressure is less than the minimum standard value, replace the radiator reservoir cap sub-assembly.
 Radiator
COMPONENTS
...
 On-vehicle cleaning
1. INSPECT RADIATOR ASSEMBLY
(a) Check that the radiator and condenser are not
blocked with leaves, dirt, or insects. Clean the hose
connections.
If the fins are blocked, wash them with water or ...
Other materials:
Disassembly
1. REMOVE REAR DIFFERENTIAL CARRIER COVER
(a) Remove the 8 bolts from the carrier cover.
(b) Using a brass bar and a hammer, separate the
carrier cover from rear differential carrier assembly.
(c) Remove the breather plug from the rear differential
carrier cover.
(d) Remove the bol ...
Removal
1. REMOVE INSTRUMENT CLUSTER CENTER NO. 1 FINISH PANEL
2. REMOVE INSTRUMENT CLUSTER CENTER NO. 2
FINISH PANEL
3. REMOVE SHIFT LEVER KNOB SUB-ASSEMBLY
4. REMOVE POSITION INDICATOR HOUSING ASSEMBLY
5. REMOVE INSTRUMENT CLUSTER CENTER LOWER FINISH PANEL SUB-ASSEMBLY
6. REMOVE POWER POINT SOCKET A ...
Customize parameters
1. Seat Belt Buzzer ON/OFF Setting
The seat belt buzzer ON/OFF setting, which is a setting
of the buzzer function of the combination meter, can
disable the driver side seat belt buzzer and front
passenger side seat belt buzzer.
NOTICE:
These buzzers should be on for safe driving.
Perform ...
