Toyota Sienna Service Manual: Front No. 2 speaker
COMPONENTS

ON-VEHICLE INSPECTION
1. INSPECT FRONT NO.2 SPEAKER
HINT: Remove interior parts so that the front No.2 speaker can be seen.
- Check the speaker installation.
OK: The speaker is securely installed.
If the result is not as specified, reinstall the front No.2 speaker.
- Visually check the speaker.
OK: The cone paper of the speaker is not torn.
If the result is not as specified, replace the front No.2 speaker.
REMOVAL
1. REMOVE INSTRUMENT PANEL SPEAKER PANEL SUB-ASSEMBLY
2. REMOVE FRONT NO. 2 SPEAKER ASSEMBLY
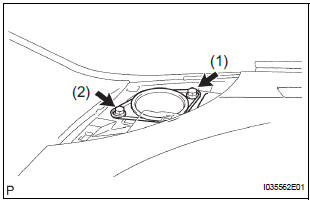
- Disconnect the connector and remove the 2 screws and the front No. 2 speaker assembly.
INSTALLATION
1. INSTALL FRONT NO. 2 SPEAKER ASSEMBLY
- Connect the connector.
- Install the front No. 2 speaker assembly with the 2 screws.
NOTICE: Tighten the screws in order shown in the illustration to install the front No. 2 speaker assembly.
2. INSTALL INSTRUMENT PANEL SPEAKER PANEL SUB-ASSEMBLY
 Front No. 1 speaker
COMPONENTS
ON-VEHICLE INSPECTION
1. INSPECT FRONT NO.1 SPEAKER
HINT:
Remove interior parts so that the front No.1 speaker can
be seen.
Check the speaker installation.
OK:
The ...
 Stereo component speaker
COMPONENTS
ON-VEHICLE INSPECTION
1. INSPECT STEREO COMPONENT SPEAKER
HINT:
Remove interior parts so that the stereo component
speaker can be seen.
Check the speaker installation.
...
Other materials:
Initialization
1. RESET SLIDING ROOF MOTOR
If the AUTO operation function does not operate,
reset the sliding roof motor using any of the
following methods.
Press the sliding roof switch on the TILT UP side
and hold it until the sliding roof motor stops.
Then release the switch and leave it untou ...
Removal
1. REMOVE GLOVE COMPARTMENT DOOR STOPPER
SUB-ASSEMBLY
2. REMOVE GLOVE COMPARTMENT DOOR
ASSEMBLY
3. REMOVE STEREO COMPONENT AMPLIFIER
ASSEMBLY (W/ STEREO COMPONENT AMPLIFIER)
4. REMOVE DISTANCE CONTROL ECU ASSEMBLY
Remove the bolt.
Disengage the clip and remove the distanc ...
GPS Mark is not Displayed
INSPECTION PROCEDURE
1 CHECK CABIN
Check the cabin for any object that might interrupt radio
reception on the instrument panel. If such an object
exists, remove it and check if the GPS mark reappears.
HINT:
The GPS uses extremely faint radio waves originating
from satellites. If the si ...
