Toyota Sienna Service Manual: Precaution
1. TIRE PRESSURE WARNING SYSTEM PRECAUTION
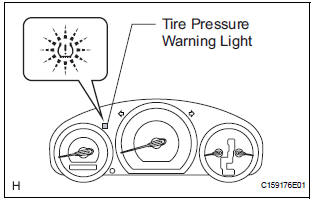
(a) When the tire pressure warning light comes on, immediately check the tire pressure of the tire and adjust it to the specified value. (The tire pressure warning light will come on after blinking for 1 minute if there is an open in the tire pressure warning light circuit.)
Cold tire inflation pressure
(b) When the tire pressure warning light comes on after blinking for 1 minute, there is a malfunction in the system. Check for DTCs.
(c) It is necessary to register the transmitter ID in the tire pressure warning ECU after replacing the tire pressure warning valve and transmitter and/or tire pressure warning ECU (See page TW-20).
(d) When replacing the tire pressure warning ECU: (1) Using the DATA LIST, read the transmitter IDs registered in the ECU and make a note of them before removing the tire pressure warning ECU.
(2) Register the transmitter IDs after installing a new tire pressure warning ECU.
(e) When replacing the tire pressure warning valve and transmitter: (1) Take a note of the 8-digit number (transmitter ID) written on the new tire pressure warning valve and transmitter when replacing it. Register the transmitter IDs in the tire pressure warning ECU after replacing the tire pressure warning valve and transmitter and installing the tires and wheels on the vehicle.
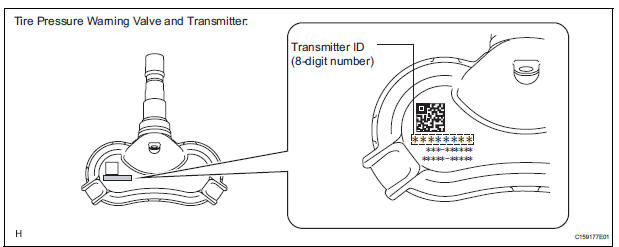
NOTICE: The transmitter ID is written on the tire pressure warning valve and transmitter. It will be unable to be read after installing the tire pressure warning valve and transmitter on the tire and wheel. Therefore, take a note of the transmitter ID before installing the tire pressure warning valve and transmitter. In order to register IDs, all 4 IDs for the vehicle are necessary.
(f) When replacing the tire pressure warning ECU and the tire pressure warning valves and transmitters, it is necessary to perform the initialization (See page TW-23) after the registration (See page TW-20).
(g) Precautions about the tire pressure:
- The tire pressures decrease naturally.
- In winter, tire pressure may decrease due to low ambient temperatures (tire pressure decreases by approximately 10 kPa (0.1 kgf/cm2, 1.45 psi) for every 10°C (50°F) drop in the ambient temperature). Therefore, the tire pressure warning is more likely to operate if the tire pressures are not adjusted appropriately. If the daily temperature variation is large, pressurize the tires high so that the tire pressures are suitable under cold conditions. Incorrect tire pressure warning operation becomes less likely.
2. IN CASE OF TIRE AND WHEEL REPLACEMENT
(a) When tires and wheels are replaced, always ensure that each transmitter ID is correctly registered.
3. IN CASE OF REPLACEMENT OF TIRE PRESSURE WARNING ECU, TIRE PRESSURE WARNING VALVE AND TRANSMITTER, OR TIRE(S) WITH DIFFERENT TIRE PRESSURE
(a) Initialize the tire pressure warning system after any of the following is performed:
- Replacing the tire pressure warning ECU or the tire pressure warning valve and transmitter.
- Installing tire(s) which require different tire pressure.
- Changing the tire inflation pressure by changing traveling speed or load weight, etc.
HINT: The tire pressure warning system will not operate properly if it is not initialized (See page TW-23).
4. FAIL-SAFE FUNCTION
(a) When a system malfunction occurs in the tire pressure warning system, the tire pressure warning light comes on after blinking for 1 minute and informs the driver of the system failure.
(b) The result of this diagnosis is stored in the tire pressure warning ECU.
5. CHECK TIRE PRESSURE AFTER REPAIRS
(a) After repairs, confirm that the actual tire pressures are displayed in DATA LIST (See page TW-35).

 Parts location
SYSTEM DIAGRAM
HINT:
The tire pressure warning valve and transmitter sends
information on the temperature inside the tire, the ID, and the
tire pressure. ...
Other materials:
Installation
1. INSTALL HEATED OXYGEN SENSOR (for Bank 2
Sensor 2)
(a) Using SST, install the heated oxygen sensor to the
front exhaust pipe.
SST 09224-00010
Torque: 40 N*m (408 kgf*cm, 30 ft.*lbf) for use
with SST
44 N*m (449 kgf*cm, 32 ft.*lbf) for use
without SST
HINT:
Use a torque wrench wit ...
Installation
1. INSTALL POWER POINT SOCKET ASSEMBLY
Engage the 2 claws to install the power point socket
assembly.
2. INSTALL QUARTER TRIM FRONT PANEL ASSEMBLY
LH
3. INSTALL BACK DOOR SCUFF PLATE
4. INSTALL BACK DOOR WEATHERSTRIP
5. INSTALL REAR DOOR WEATHERSTRIP LH
6. INSTALL REAR DOOR S ...
Inspection
1. INSPECT BRAKE CYLINDER AND PISTON
(a) Check the brake cylinder bore and front disc brake
piston for rust or scoring.
2. INSPECT PAD LINING THICKNESS
(a) Using a ruler, measure the pad lining thickness.
Standard thickness:
12.0 mm (0.472 in.)
Minimum thickness:
1.0 mm (0.039 in.)
3. ...
