Toyota Sienna 2010-2026 Owners Manual: Rear view monitor system
The rear view monitor system assists the driver by displaying an image of the view behind the vehicle and guide lines while backing up, for example while parking. The screen illustrations used in this text are intended as examples, and may differ from the image that is actually displayed on the screen.
- With guide function
Refer to the ÔÇťNAVIGATION AND MULTIMEDIA SYSTEM OWNERÔÇÖS MANUALÔÇŁ.
- Without guide function
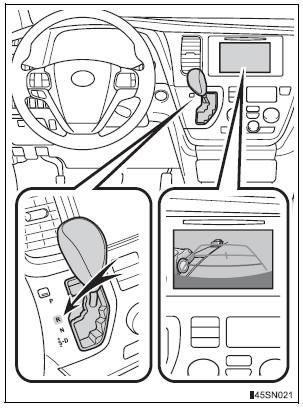
The rear view monitor system will activate when the shift lever is in R.
If you move the lever out of R, the rear view monitor system will be deactivated.
When the shift lever is shifted to R and any mode button (such as ÔÇťAPPSÔÇŁ/ÔÇťSETUPÔÇŁ) is pressed, the rear view monitor system is canceled, and the screen is switched to the mode of the button that was pressed.
 Setting up intuitive parking assist
You can change the buzzer sound volume and the screen operating
conditions.
Press the ÔÇťAPPSÔÇŁ button.
Select ÔÇťSetupÔÇŁ on the screen.
Select ÔÇťVehicleÔÇŁ on the screen.
Select ÔÇťTOYO ...
 Using the rear view monitor system
Screen description
The rear view monitor system screen will be displayed if the shift
lever is shifted to R while the engine switch is in the ÔÇťONÔÇŁ position
(vehicles without a smart key system) ...
Other materials:
Anti-glare function
Manual anti-glare inside rear view mirror
Reflected light from the headlights of vehicles behind can be reduced
by operating the lever.
Normal position
Anti-glare position
Auto anti-glare inside rear view mirror
Responding to the level of brightness of the headlights of veh ...
On-vehicle inspection
1. INSPECT STEERING PAD (VEHICLE NOT INVOLVED IN COLLISION)
Perform a diagnostic system check.
With the steering pad installed on the vehicle,
perform a visual check. If there are any defects as
mentioned below, replace the steering pad with a
new one:
Cuts, minute cracks or marked ...
Installation
1. INSTALL TRANSFER EXTENSION HOUSING TYPE T OIL SEAL
(a) Using SST(s), install anew transfer extension
housing type T oil seal to he transfer extension
housing sub-assembly at the position show in the
illustration.
SST 09325-20010
NOTICE:
Do not install the oil seal obliquely.
(b) Apply ...
