Toyota Sienna Service Manual: Removal
1. REMOVE ENGINE ASSEMBLY WITH TRANSAXLE
HINT: (See page EM-34)
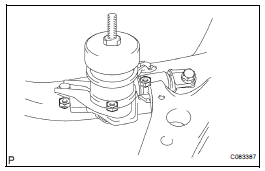
2. REMOVE TRANSVERSE ENGINE ENGINE MOUNTING INSULATOR
(a) Remove the 3 nuts and transverse engine engine mounting insulator.

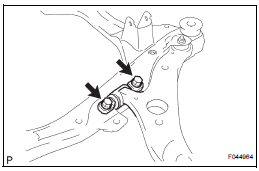
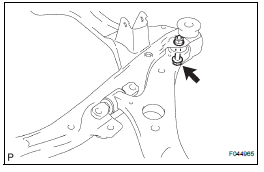
3. REMOVE FRONT SUSPENSION ARM SUBASSEMBLY LOWER NO.1 LH

(a) Remove the 2 bolts on the front side of the front suspension arm sub-assembly lower No.1 LH.

(b) Remove the bolt and nut on the rear side of the front suspension arm sub-assembly lower No.1 LH.
(c) Remove the front suspension arm sub-assembly lower No.1 LH.
(d) Remove the front lower arm bush stopper from the front suspension arm sub-assembly lower No.1 LH.
 Front lower suspension arm
Components
...
 Installation
1. INSTALL FRONT SUSPENSION ARM SUBASSEMBLY LOWER NO.1 LH
(a) Install the front lower arm bush stopper to the front
suspension arm sub-assembly lower No.1 LH.
(b) Install the bolt and nut to ...
Other materials:
Installation
1. INSTALL SEAT POSITION AIRBAG SENSOR
Check that the ignition switch is off.
Check that the negative battery (-) terminal is
disconnected.
CAUTION:
After disconnecting the negative battery
terminal, wait for at least 90 seconds before
starting the operation.
...
Inspection and adjustment procedure
Tire valve
Tire pressure gauge
Remove the tire valve cap.
Press the tip of the tire pressure gauge onto the tire valve.
Read the pressure using the gauge gradations.
If the tire inflation pressure is not at the recommended level, adjust
the pressure.
If you add too much air, ...
Installation
1. INSTALL AIR FUEL RATIO SENSOR (for Bank 2
Sensor 1)
(a) Using SST, install the sensor to the exhaust
manifold LH.
SST 09224-00010
Torque: 40 N*m (408 kgf*cm, 30 ft.*lbf) for use
with SST
44 N*m (449 kgf*cm, 32 ft.*lbf) for use
without SST
HINT:
Use a torque wrench with a fulcrum ...
