
Toyota Sienna Service Manual: Installation
1. INSTALL FRONT SUSPENSION ARM SUBASSEMBLY LOWER NO.1 LH
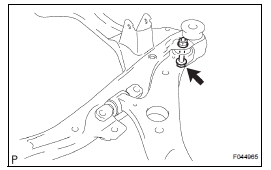
(a) Install the front lower arm bush stopper to the front suspension arm sub-assembly lower No.1 LH.
(b) Install the bolt and nut to the rear side of the front suspension arm sub-assembly lower No.1 LH.
Torque: 206 N*m (2,100 kgf*cm, 152 ft.*lbf)
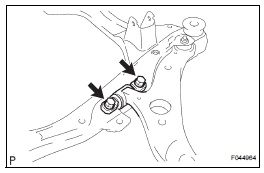
(c) Install the 2 bolts on the front side of the front suspension arm sub-assembly lower No.1 LH.
Torque: 200 N*m (2,040 kgf*cm, 148 ft.*lbf)
2. INSTALL TRANSVERSE ENGINE ENGINE MOUNTING INSULATOR
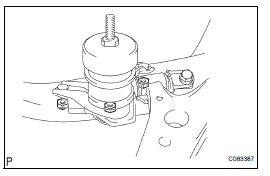
(a) Install the transverse engine engine mounting insulator with the 3 nuts.
Torque: 87 N*m (887 kgf*cm, 64 ft.*lbf)
3. INSTALL ENGINE ASSEMBLY WITH TRANSAXLE
HINT: (See page EM-52)
 Removal
1. REMOVE ENGINE ASSEMBLY WITH TRANSAXLE
HINT:
(See page EM-34)
2. REMOVE TRANSVERSE ENGINE ENGINE MOUNTING INSULATOR
(a) Remove the 3 nuts and transverse engine engine
mounting insulator.
3 ...
 Front lower ball joint
COMPONENTS
...
Other materials:
Voice Guidance does not Function
INSPECTION PROCEDURE
1 CHECK NAVIGATION SYSTEM SETTING
Enter the "Menu" screen by pressing the "MENU" switch.
Select "Volume".
Check that "OFF" is not selected.
OK:
"OFF" is not selected
2 CHECK NAVIGATION SETTING
...
Oil and oil filter
COMPONENTS
REPLACEMENT
CAUTION:
Prolonged and repeated contact with engine oil will
result in the removal of natural oils from the skin,
leading to dryness, irritation and dermatitis. In
addition, used engine oil contains potentially harmful
contaminants which may caus ...
Actuator Supply Voltage Circuit / Open
DTC P0657 Actuator Supply Voltage Circuit / Open
DESCRIPTION
The ECM monitors the output voltage to the throttle actuator. This self-check
ensures that the ECM is
functioning properly. The output voltage is usually 0 V when the ignition switch
is turned off. If the output
voltage is higher t ...
