Toyota Sienna Service Manual: Removal
1. REMOVE AIR CONDITIONING NO.2 CONTROL ASSEMBLY
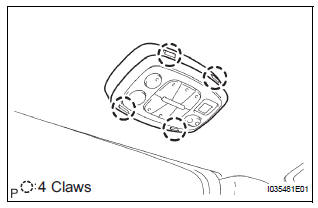
(a) Release the 4 claw fittings and release the air conditioning No. 2 control assembly.
(b) Disconnect the connectors and remove the air conditioning No. 2 control assembly.
 Air conditioning control assembly
COMPONENTS
...
 Disassembly
1. REMOVE CONTROL KNOB SUB-ASSEMBLY (for Manual Air Conditioning System)
(a) Remove the control knob sub-assembly.
2. REMOVE AIR CONDITIONING CONTROL BULB
(a) Remove the air conditioning co ...
Other materials:
Installation
1. INSTALL THROTTLE BODY
(a) Install a new throttle body gasket to the intake air
surge tank.
(b) Install the throttle body with the 4 bolts.
Torque: 10 N*m (102 kgf*cm, 7 ft.*lbf)
(c) Connect the 2 water by-pass hoses.
(d) Connect the throttle body connector and clamp.
2. INSTA ...
Eject Error/ Elevator Error/ Clamp Error/ Eject Error/ Elevator Error/ Clamp
Error
DTC 62-45 Eject Error
DTC 62-51 Elevator Error
DTC 62-52 Clamp Error
DTC 63-45 Eject Error
DTC 63-51 Elevator Error
DTC 63-52 Clamp Error
DESCRIPTION
DTC No.
DTC Detecting Condition
Trouble Area
62-45
Disc cannot be ejected.
Radio receiver
62-5 ...
Disposal
HINT:
When scrapping a vehicle equipped with the SRS or
disposing of the front passenger airbag assembly, be sure to
deploy the airbag first in accordance with the procedure
described below. If any abnormality occurs with airbag
deployment, contact the SERVICE DEPT. of the TOYOTA
MOTOR SALES, ...
