Toyota Sienna Service Manual: Removal
1. PRECAUTION
CAUTION: Be sure to read "PRECAUTION" thoroughly before servicing.
2. DISCONNECT CABLE FROM NEGATIVE BATTERY TERMINAL
CAUTION: Wait for 90 seconds after disconnecting the cable to prevent the airbag working.
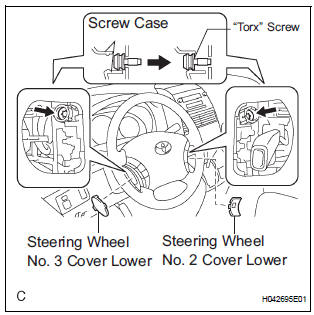
3. REMOVE STEERING WHEEL NO.3 COVER LOWER
- Using a screwdriver, remove the steering wheel No.3 cover lower.
HINT: Tape up the screwdriver tip before use.
4. REMOVE STEERING WHEEL NO.2 COVER LOWER
- Using a screwdriver, remove the steering wheel No.2 cover lower.
HINT: Tape up the screwdriver tip before use.
5. REMOVE STEERING PAD
- Using a "torx" socket wrench (T30), loosen the 2 "torx" screws until the groove along the screw circumference catches on the screw case.
- Pull out the steering pad from the steering wheel
assembly and support the steering pad with one
hand as shown in the illustration.
NOTICE: When removing the steering pad, do not pull the airbag wire harness.
- Disconnect the horn connector.
- Disconnect the 2 connectors from the steering pad.
NOTICE: When handling the airbag connector, take care not to damage the airbag wire harness.
- Remove the steering pad.

 On-vehicle inspection
1. INSPECT STEERING PAD (VEHICLE NOT INVOLVED IN COLLISION)
Perform a diagnostic system check.
With the steering pad installed on the vehicle,
perform a visual check. If there are any defe ...
 Installation
1. INSTALL STEERING PAD
Support the steering pad with one hand as shown in
the illustration.
Connect the 2 connectors to the steering pad.
NOTICE:
When handling the airba ...
Other materials:
Hitch
Trailer hitch assemblies have different weight capacities. Toyota recommends
the use of Toyota hitch/bracket for your vehicle. For details,
contact your Toyota dealer.
If you wish to install a trailer hitch, contact your Toyota
dealer.
Use only a hitch that conforms to the gross trailer w ...
No. 2 Ultrasonic sensor
COMPONENTS
REMOVAL
1. REMOVE REAR BUMPER COVER (2)
2. REMOVE NO. 1 ULTRASONIC SENSOR RETAINER
Remove the No. 1 ultrasonic sensor retainer as
shown in the illustration
3. REMOVE NO. 2 ULTRASONIC SENSOR
Disconnect the connector and remove the No. 2
ultrasonic ...
Perform monitor drive pattern
The monitor results and test values can be checked with
the OBD II scan tool or the intelligent tester. The engine
control module (ECM) monitors the emissions-related
components such as the thermostat, catalyst converter
and evaporative emissions (EVAP), and determines
whether they are function ...
