Toyota Sienna Service Manual: Removal
1. PRECAUTION
CAUTION: Be sure to read "PRECAUTION" thoroughly before servicing.
2. DISCONNECT CABLE FROM NEGATIVE BATTERY TERMINAL
CAUTION: Wait for 90 seconds after disconnecting the cable to prevent the airbag working.
3. PLACE FRONT WHEELS FACING STRAIGHT AHEAD
4. REMOVE STEERING WHEEL NO.3 COVER LOWER (24)
5. REMOVE STEERING WHEEL NO.2 COVER LOWER (24)
6. REMOVE STEERING PAD (24)
7. REMOVE STEERING WHEEL ASSEMBLY
8. REMOVE STEERING COLUMN COVER
9. REMOVE GLOVE COMPARTMENT DOOR ASSEMBLY
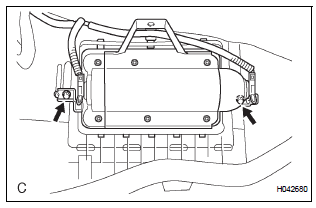
10. REMOVE INSTRUMENT PANEL BOX NO.2
11. DISCONNECT FRONT PASSENGER AIRBAG ASSEMBLY CONNECTOR
- Disconnect the connector from the front passenger airbag assembly.
NOTICE: When handling the airbag connector, take care not to damage the airbag wire harness.
12. REMOVE INSTRUMENT PANEL SUB-ASSEMBLY

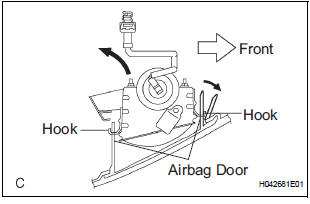
13. REMOVE FRONT PASSENGER AIRBAG ASSEMBLY
- Remove the 2 screws.
- Release the front side wall of the airbag door from the hook by slightly deflecting it and roll the front passenger airbag assembly rearward.
- Release the rear side wall of the airbag door from the other hook and remove the front passenger airbag assembly.
 On-vehicle inspection
1. INSPECT FRONT PASSENGER AIRBAG ASSEMBLY
(VEHICLE NOT INVOLVED IN COLLISION)
Perform a diagnostic system check.
With the front passenger airbag assembly installed
on the veh ...
 Installation
1. INSTALL FRONT PASSENGER AIRBAG ASSEMBLY
Install the front passenger airbag assembly with the
2 screws.
2. INSTALL INSTRUMENT PANEL SUB-ASSEMBLY
3. CONNECT FRONT PASSENGER AIRBAG ...
Other materials:
Removal
1. BOLT, SCREW AND NUT TABLE
The bolts, the screws and the nuts, which are
necessary for installation and removal of the
instrument panel are shown in the illustration below
with alphabets.
2. DISCONNECT BATTERY NEGATIVE TERMINAL
3. REMOVE STEERING WHEEL COVER LOWER NO.2
4. ...
On-vehicle inspection
1. INSPECT BRAKE BOOSTER
(a) Air tightness check.
(1) Start the engine and stop it after 1 or 2 minutes.
Depress the brake pedal several times slowly.
HINT:
If the pedal goes down farthest at the 1st time,
and gradually rises at the 2nd or 3rd time, the
booster is airtight.
(2) Depre ...
Dtc check / clear
1. DTC CHECK (SENSOR CHECK)
(a) After the indicator check is completed, the system
enters the DTC check mode automatically.
(b) Read the codes displayed on the panel. Refer to the
list of codes (See page AC-19) when reading the
codes. (Trouble codes are output at the temperature
display. ...
