Toyota Sienna Service Manual: Removal
1. PRECAUTION
CAUTION: Be sure to read "PRECAUTION" thoroughly before servicing.
2. DISCONNECT CABLE FROM NEGATIVE BATTERY TERMINAL
CAUTION: Wait for 90 seconds after disconnecting the cable to prevent the airbag working.
3. REMOVE FRONT SEAT ASSEMBLY (for Manual Seat)
4. REMOVE FRONT SEAT ASSEMBLY (for Power Seat)
5. REMOVE RECLINING ADJUSTER RELEASE HANDLE LH (for Manual Seat)
6. REMOVE VERTICAL SEAT ADJUSTER KNOB CAP (for Manual Seat)
7. REMOVE VERTICAL ADJUSTING HANDLE NO.2 (for Manual Seat)
8. REMOVE FRONT SEAT CUSHION SHIELD LH (for Manual Seat)
9. REMOVE SLIDE AND VERTICAL POWER SEAT SWITCH KNOB (for Power Seat)
10. REMOVE RECLINING POWER SEAT SWITCH KNOB (for Power Seat)
11. REMOVE FRONT SEAT CUSHION SHIELD ASSEMBLY
- Remove the 5 screws and the front seat cushion shield assembly.
12. REMOVE SEAT SLIDE POSITION SENSOR PROTECTOR

- Remove the seat slide position sensor protector from the seat position sensor.
13. REMOVE SEAT POSITION SENSOR
- Disconnect the connector from the seat position sensor.
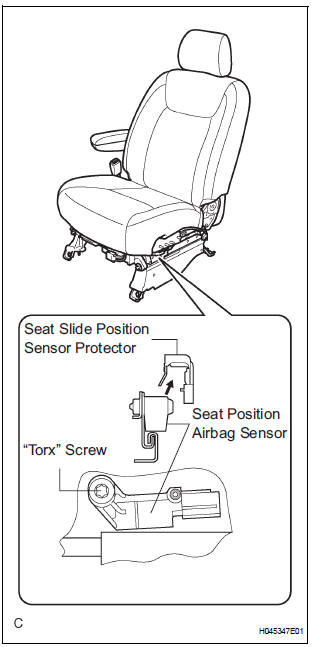
- Using a "torx" socket wrench (T30), remove the "torx" screw and the seat position sensor.
 On-vehicle inspection
1. INSPECT SEAT POSITION SENSOR (VEHICLE NOT
INVOLVED IN COLLISION)
Perform a diagnostic system check.
2. INSPECT SEAT POSITION SENSOR (VEHICLE
INVOLVED IN COLLISION)
Perform ...
 Installation
1. INSTALL SEAT POSITION AIRBAG SENSOR
Check that the ignition switch is off.
Check that the negative battery (-) terminal is
disconnected.
CAUTION:
After disconnecting the ...
Other materials:
Open in Front Passenger Side Squib Circuit
DTC B0106/54 Open in Front Passenger Side Squib Circuit
DESCRIPTION
The front passenger side squib circuit consists of the center airbag sensor
assembly and the front
passenger airbag assembly.
The circuit instructs the SRS to deploy when deployment conditions are met.
DTC B0106/54 is rec ...
Engine Coolant Temperature Circuit Range /
Performance Problem
DTC P0116 Engine Coolant Temperature Circuit Range /
Performance Problem
DESCRIPTION
Refer to DTC P0115
DTC No.
DTC Detection Condition
Trouble Area
P0116
ECTs as listed below are nearly same (2 trip detection
logic):
ECT when engine is start ...
Terminals of ECU
1. CHECK TRANSPONDER KEY AMPLIFIER
Disconnect the I14 amplifier connector and measure
the resistance between the terminal of the wire
harness side connector and body ground.
If the result is not as specified, there may be a
malfunction on the wire harness side.
Reconnec ...
