Toyota Sienna Service Manual: Removal
1. REMOVE REAR DOOR SCUFF PLATE LH
2. REMOVE REAR DOOR WEATHERSTRIP LH
3. REMOVE BACK DOOR WEATHERSTRIP
4. REMOVE BACK DOOR SCUFF PLATE
5. REMOVE QUARTER TRIM FRONT PANEL ASSEMBLY LH
6. REMOVE POWER POINT SOCKET ASSEMBLY
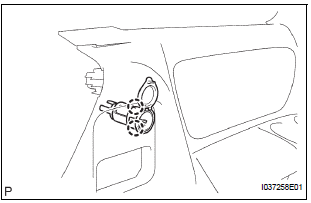
- Release the 2 claw fittings and remove the power point socket assembly.
 Power point socket (for Rear Side)
COMPONENTS
...
 Installation
1. INSTALL POWER POINT SOCKET ASSEMBLY
Engage the 2 claws to install the power point socket
assembly.
2. INSTALL QUARTER TRIM FRONT PANEL ASSEMBLY
LH
3. INSTALL BACK DOOR SCUFF PL ...
Other materials:
Personal light assembly
ON-VEHICLE INSPECTION
1. ROOF CONSOLE BOX ASSEMBLY
Inspect map light assembly resistance.
Check the resistance between the terminals at
each switch position as shown in the chart.
Resistance
...
Slide Door Closer RH does not Operate
DESCRIPTION
The slide door ECU RH controls the slide door closer. In response to the
signals output from the switches
in the slide door lock, the slide door closer drives the closer motor.
HINT:
The slide door closer system operates regardless of the power slide door main
switch ON / OFF.
W ...
Throttle Actuator Control System
DTC P2111 Throttle Actuator Control System - Stuck Open
DTC P2112 Throttle Actuator Control System - Stuck
Closed
DESCRIPTION
The throttle actuator is operated by the ECM, and opens and closes the
throttle valve using the gears.
The opening angle of the throttle valve is detected by the Thr ...
